
How To Install A Vapour Control Layer
Interstitial condensation within a property’s structure can be a serious problem and one that’s expensive to remedy. The correct use of Vapour Control Layers is one way to protect the fabric of a building and reduce the chance of damage to the insulation and timbers. In this guide, we look at how vapour barriers work, why you need them and how to install them.
What Is a Vapour Control Layer & How Do They Work?
A Vapour Control Layer, or VCL for short, is a plastic layer that restricts the movement of warm, moist air from inside a property into the fabric of the building.
VCLs prevent excess moisture entering a wall’s cavity, behind the insulation. This reduces the risk of harmful interstitial condensation by ensuring that any moisture within the cavity is at a manageable level.
Any small amount of vapour that does exist within the wall cavity will evaporate outside due to the porous nature of bricks. It is therefore important that any paints or potential barriers are removed from the exterior brickwork so that this evaporation process can occur.

The Importance of a Vapour Control Membrane
Whenever you introduce insulation to a building’s walls or roof, you are creating a cold space between the insulation and outer structure. This means there is a potential area where interstitial condensation can occur.
It is therefore important to control the movement of warm, moist air to stop it condensing on the cold outer surface as this can create mould and cause the rotting of structural timbers. VCLs control the amount of moisture that is able to pass through, meaning that the structure can cope with the levels of moisture.
When Is a Vapour Control Layer Needed?
VCLs are a requirement in Building Regulations in certain new build situations. Existing properties might require a VCL if you are:
- introducing internal stud walls and insulation
- installing a new concrete floor with insulation
- modifying the roof space
Areas of high humidity would also need consideration.
Benefits of a VCL
- Prevents interstitial condensation which reduces the chance of mould and rot
- Protects the insulation in a concrete floor build up from wet screeds
- Reduces heat loss and improves energy efficiency
Vapour Control Layer Installation
Wall Installation for Vapour Control Layers
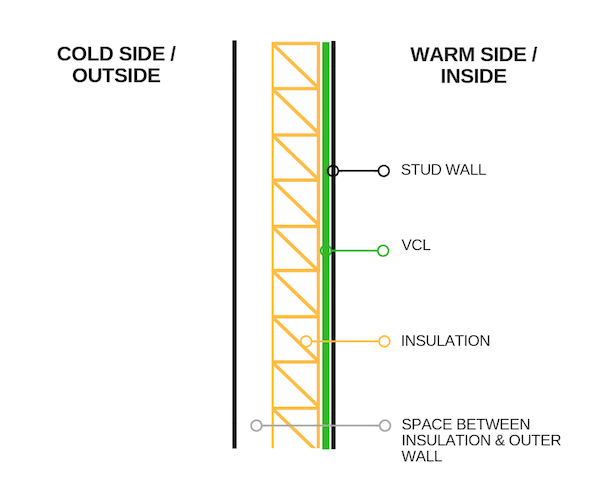
Generally speaking, when you install a VCL to the walls of existing properties, you are installing a stud wall with insulation.
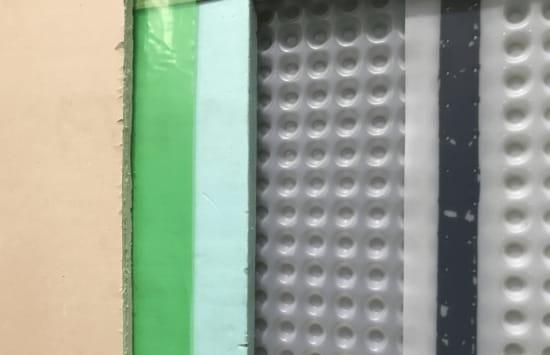
- If you use permeable insulation material such as sheep’s wool, rockwool or fibreglass, the VCL is installed to the warm side of the insulation. The VCL is stapled to the timber studwork with the insulation wedged between the timber studs.
- Any joints will need to be sealed with Single Sided Foil Tape. Remember, it is very important to seal everything and not just sections of VCL membrane. These include the ceiling joint, floor joint and any vertical joints where the VCL meets adjoining walls. As well as foil tape, expanding foam is another possible option for this. Masonry/wood primers combined with tape is another option.
- Once installed, plasterboard can be screwed to the studs and then skimmed. Ensure that the joint between the bottom of the plasterboard and the floor is sealed. Ask your plasterer to leave a 20mm gap between the bottom of the board and the floor which can then be filled with expanding foam.
Installing a Vapour Control Layer Under a Floor
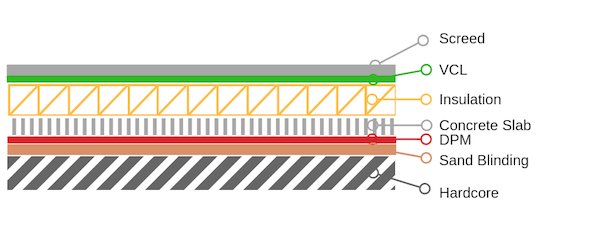
A typical concrete floor build up that incorporates a VCL would be as follows:
- Hardcore
- Sand blinding
- Damp Proof Membrane
- Concrete Slab
- Insulation
- Vapour Control Layer
- Screed
Overlaps of the VCL membrane are sealed together with Double Sided Tape and the face of the joint sealed with Single Sided Foil Tape.
How to Install a Vapour Control Layer in a Roof or Loft
Interstitial condensation can occur in insulated lofts which have non-permeable roofing felt. This results in white fluffy mould on the underside of the roofing felt.
Installing a VCL in your roof or loft space is a similar principle to the wall installation in that the VCL membrane is placed on the warm side of the insulation. Installations vary but usually the VCL is used in conjunction with breather membranes and ventilation systems when used in a roof space to encourage air flow.
Vapour Control Layers FAQs
What Is the Benefit of Using a Vapour Control Layer vs DPM?
-
When talking about floors, a vapour control layer is positioned at a different level to the damp proof membrane so generally you wouldn’t be able to substitute one for the other.
Can You Use a DPM as Vapour Barrier?
-
You can use a DPM sheet as a VCL and it will do the same job as long as it is sealed correctly and placed in the correct position – on the warm side of the insulation.
What’s the Difference Between a Vapour Control Layer and a Vapour Control Barrier?
-
Vapour Control Layers and vapour barriers are essentially the same thing. Some people and organisations will refer to the material that controls vapour movement as a VCL and some will call it a vapour barrier.
It is important to remember that no material is completely vapour proof so the term ‘barrier’ can be slightly misleading. VCLs or vapour barriers will only reduce the vapour movement to an acceptable level. However, if the joints and perimeters are not sealed correctly, the VCL / vapour barrier is rendered useless.
Do I Need Vapour Control Layers for My Floor?
-
In ground floor applications such as concrete slabs and beam and block applications, a VCL is required on the warm side of the insulation. This will also help protect the insulation from wet screed or concrete.
Suspended timber floors are slightly different. There are differing opinions around whether to introduce a VCL or not, and where to place it. If the VCL is not installed properly, it can create more issues with condensation.
In an ideal scenario, the VCL would be placed to the top side of the joists before boards are laid. The insulation would be below this, meaning that the VCL is on the warm side of the insulation. This would then stop warm, moist air from entering the structural elements.
Permagard – Damp Proofing Experts
As experts in the field, Permagard are able to provide advice on VCL installation and troubleshooting. You can contact our expert team free of charge on 0117 982 3282 – they are always happy to share technical information and answer your questions.


 - 75mm x 50m")