
How to Re-Render Walls After a DPC
Most buildings are fitted with a damp proof course – a physical barrier that prevents water from moving up through the walls. In some instances, however, the damp proof course (DPC) fails or was simply never installed in the property. In these situations, the property is vulnerable to rising damp and the associated issues with damp, salt contamination and tidemarks.
Once rising damp has been correctly identified, it needs to be resolved by installing a new damp proof course (DPC). This ‘how to guide’ looks at what you need to do once the new DPC has been installed to prepare the walls and get the room back to how you want it.
Rising Damp
Rising damp is when water from the ground enters a structure and rises up the wall by capillary action. Ordinarily, there is a barrier in place that prevents this from happening – this is called a DPC. Click through for more information about rising damp and identifying it in your home.
Installing a New Damp Proof Course
If the property doesn’t have a DPC in place or an existing one has failed then you can install a new one using a damp proofing injection cream. A new DPC is normally injected approximately 150mm above the external ground level. You can read our guide to find out exactly how to treat rising damp with damp proof injection cream.
Why Re-Render after a new damp proof course?
When rising damp is present, you generally get high levels of hygroscopic salts in the surface plaster, render and the background substrate. Although a new damp proof course will prevent any further moisture from rising up and carrying these hygroscopic salts, it doesn't deal with the contaminants already present in the render. These contaminants will often cause moisture to be attracted to the wall, causing further dampness, decorative spoiling, and giving the impression that the DPC has not been successful.
For this reason, it is imperative that all plaster and render be removed back to the original substrate to a minimum height of one metre or 500mm above the highest sign of salts or damp and one of the following re-rendering processes be applied:
Re-Rendering after a DPC
There are a few ways that you can re-render your walls after the installation of a new damp proof course:
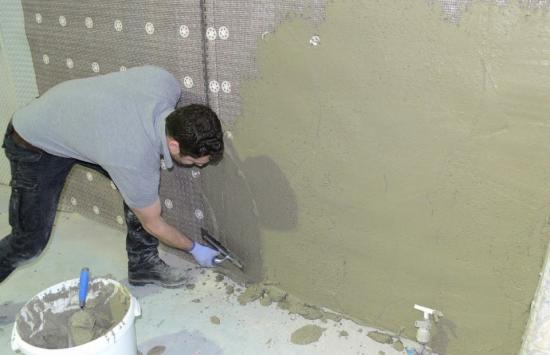
Sand and Cement Modified Render
This more traditional rendering method requires you to wait four to six weeks for the wall to start to dry. You can then use a special modified sand and cement render, which inhibits moisture and salts from passing through it. This method protects your new surface and finishes during and after the drying out process.
First Coat
A mix of three parts by volume of washed sharp sand to one part of cement gauged with clean water, containing one part of Permaproof Waterproofer per 24 parts of water.
The ingredients should conform to the following spec:
- Ordinary Portland Cement (OPC) to BS EN 197 – 1: 2011
- Aggregate should be clean sharp washed sand. The coarsest, sharpest sand suitably graded for plastering should conform to BS EN 13139: 2002.
- Water – must be clean, free from organic contaminants and fit for drinking.
The modified render should be applied to a thickness of 12mm and scratched during its drying process to give a key for the next coat.
Second Coat
A mix of three parts by volume of washed sharp sand to one part of cement gauged with clean water containing one part of Permaproof Waterproofer per 24 parts of water. Applied at approximately 8-10mm before a standard multi finish plaster is applied.
+ Inexpensive
+ Controls dampness passing through walls.
+ Breathable, substrates dry naturally after application.
+ Provides a barrier against salt transfer.
- The wall should be left for 4-6 weeks to dry out before you can use this method
Renovating Plaster
Permagard Renovating Plaster is a pre-bagged render designed to have similar properties to a 1:1:6 cement:lime:sand plastering mortar, but with Perlite lightweight aggregate replacing the sand. As well as containing waterproofing & salt inhibiting additives, it also has man-made fibres incorporated into the mix to control shrinkage and improve flexural strength. It is ideal for use on small or large jobs after the installation of a new damp proof course.
+ Pre-mixed specialist render - simply add water on site
+ Controls dampness passing through walls
+ Breathable - allows substrates to dry naturally after application
+ Provides a barrier against salt transfer
- The wall should be left for 4-6 weeks to dry out before you can use this method
Damp Proof Membrane
Damp proof membranes are a highly effective method of making good and protecting your home after a new DPC installation. You apply the plastic mesh membrane to the area that has been hacked off and injected with the DPC. This membrane creates a barrier against salts and moisture so they cannot transfer into the new finishes. Once the membrane is fixed the surface is then ready to have a render applied to it.
The membranes are designed with a special studded profile that allows air to circulate continuously, allowing the wall to dry out.
These specialist membranes also has a mesh welded to the membrane that provides an excellent key for a variety of wall finishes. These two features mean that you don’t have to wait for the wall to dry out.
The membrane also becomes a physical barrier between the old surface finish and the new internal finish, preventing any future discolouration or salt deposits occurring on the plaster and decoration. Suitable membranes include PermaSEAL 3 Mesh or Newton 803 Newtonite.
+ Guaranteed long-lasting protection
+ Quick to install immediately after a DPC installation
+ Can be used on virtually any surface
+ Easy to fix and leave a flawless finish.
If you opt for a damp proof membrane, then you should consider a…
Damp Proofing Membrane Kit
For quick and easy rendering, use a damp proofing membrane kit as this will provide you with everything you need. Our PermaSEAL kits have been specifically designed for application after the insertion of a new damp proof course.
The kit includes:
- 1 x Roll of 3mm Meshed Membrane (10m²)
- 200 x PermaSEAL Plaster Plugs 50mm
- 200 x PermaSEAL Sealing washers
- 1 x 7mm Masonry Drill bit
What makes our kits so appealing is that it allows you to install the membrane straight after the damp proof course - no waiting time is needed. Your walls can be rendered or dot and dabbed immediately after the installation of the membrane, saving you a lot of time and energy.
Rendering onto a Damp Proof Membrane
These membranes are designed for ease of finishing and decorating. You have three principle options:
Render Directly
As we’ve mentioned, these damp proofing membranes come with a mesh that allows you to render directly onto them. The mesh provides an excellent key so you can plaster straight onto it.
The recommended plaster for a Mesh Membrane is Tarmac Whitewall One Coat. The application of the plaster should be in two coats: a 6mm scratch coat and a 6mm second or float coat. If a finish coat is required this should be 3mm.
Tarmac Whitewall should be applied in accordance with good plastering practice as described in BS 8481 : 2006, BS EN 13914-2 : 2005. Always allow 24 hours drying time between coats of plaster. For a high impact resistant finish, use Whitewall High Impact Backing Plaster.
Note: We do not recommend Tarmac Whitewall is used in one single coat to mesh membranes.

Sand, Cement and Lime
You can render with a mix of sand, cement and lime. This should be applied in two coats using the procedures defined within BS EN 13914-1: 2005 to a total thickness of 14mm. The scratch coat should be 7mm and the second or float coat should also be 7mm.
A 3mm skim coat of finishing plaster can be added once the render is fully cured.
Scratch Coat - the scratch coat should be a mix of one part lime, one part cement, five parts clean well-graded sharp sand. The purpose of the 7mm scratch coat is to stiffen up the lath and to provide rough and absorbent backing for subsequent coats. Work this scratch coat well into the mesh.
Float Coat - the second or float coat should be a mix of one part lime, one part cement, six parts clean well-graded sharp sand.
Each 7mm coat of render should be allowed to dry for a period of no less than seven, preferably ten days and longer if possible. Cracking may occur if shorter time is allowed between coats.
Dot and dab method
You can fix plasterboard panels directly to the membrane using the dot and dab method (sometimes referred to as dry lining). This methods involves using a plasterboard or drywall adhesive to affix the boards to the membrane. This then gives you a dry surface that is ready for immediate decoration.
The usual dot and dab process should be followed, with a minimum of 50% of the plasterboard covered with dab adhesive.
Permagard – Damp Proofing Membrane Experts
Permagard manufactures a variety of damp proofing membranes including those ideal for use following the installation of a DPC. Our PermaSEAL products are all highly effective and reliable. View our selection of damp proof membranes for further product information or call our team for free expert advice.


