
Using Damp Proofing Injection Cream to Treat Rising Damp
Rising damp can be a very serious issue for homeowners. Thankfully, technology has advanced and high-strength damp proofing creams have been developed to effectively stop rising damp. When installed correctly, injection damp proof courses provide a long-term and reliable solution to the horrors of rising damp.
What is Rising Damp?
Rising damp occurs when ground water moves up a wall through small tubes in the bricks by capillary action (like a straw sucking up water). Most walls allow some water in, but it’s usually stopped from causing damage by a barrier called a damp proof course (DPC). If you don’t have a DPC or it has failed then there is nothing to stop water rising up your wall. Rising damp can also occur when the ground level outside your home is higher than your damp-proof course, allowing water to bridge the damp proof course.
It is vitally important to know for certain that you have rising damp. It is a relatively rare form of damp and treatment will only work if correctly diagnosed. It is always best to consult a professional. To find out more about Rising Damp and how to identify it then read our Damp Guide. Once rising damp has been diagnosed you can then look at your options for treating it.
How to Treat Rising Damp Using Damp Proofing Cream
By far the quickest, most economical and effective method to treat rising damp is to use a high strength damp proofing cream. This cream is injected into holes drilled in the mortar joint. It then penetrates the masonry to provide a water repellent barrier. You are now able to relax safe in the knowledge that you have a high performance chemical damp proof course installed and that your home is protected from rising damp. Another benefit is that the damp proof injection method can be used in walls that are highly saturated with water.
How Do Damp Proofing Creams Work?
Damp proof creams are scientifically formulated to penetrate deep inside the building material. They have a consistency that allows the active ingredient, silane, to be absorbed into the substrate both vertically and horizontally without running out. The silane then lines the capillaries before curing to create a water repellent barrier.
How to Inject Damp Proofing Cream
Preparing to Inject Damp Proofing Cream
You will need to prepare both internally and externally before injecting your damp proofing cream. Start by removing any skirting boards, architraves, as well as disconnecting any radiators. You will want to expose the brickwork to the required level before starting injecting the DPC.
If you are suffering from rising damp then damp will have left tidemarks and other visible damp damage on the plaster. It is important to remove this contaminated plaster before injecting a DPC. Hack off the plaster to a height of no less than a metre.
In some rare instances, depending on the conditions, the water may have been wicked up higher than one metre so you should consider removing plaster at least 300mm above the highest visible sign of damp/ hydroscopic salts. It’s also worth pointing out that rising damp will not necessarily rise uniformly to the same level across all parts of a wall so adjust the amount of plaster to be removed accordingly without ever slipping below one metre.
You are now ready to inject the Damp Proofing Cream:
Injecting Damp Proofing Cream
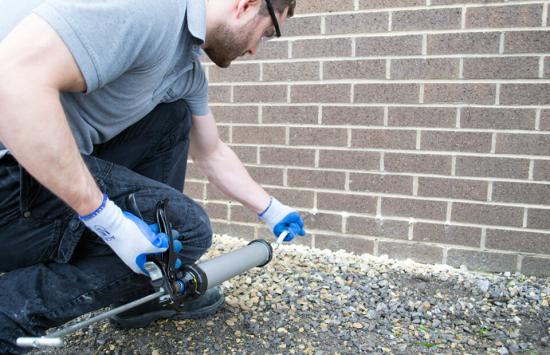
- Drill 12mm diameter holes horizontally into the mortar joint 150mm above ground level - if this is not possible then flanking works must be introduced to stop bridging of the damp proof course. Always drill with a 12mm drill bit to a depth of 10-20mm from the opposite face and at 120mm centres, never more. Do not drill into the bricks or stone and always follow the mortar joint in one continuous line.

- Inject the cream into the boreholes using a low pressure sprayer or cartridge gun.

- Leave the cream to revert to its liquid phase and penetrate the masonry surrounding the hole.
- The silane then lines the capillaries in the substrate to create a water repellent barrier.
DPC Creams can take up to 6 weeks to fully cure and create a new damp proof course.
Making Good
Injecting a Damp Proof Cream is only the first step. You will need to replaster internally. It is recommended that you delay the replastering works for as long as is feasible to facilitate the maximum possible period for drying. However, this is not always possible so products like the damp proof membrane kit and PermaSEAL tanking can be used for early replastering.
Re-rendering should always be to a specific re-rendering specification to stop salts from transferring into the new plaster. See our Guide to Internal Waterproofing for more information. Externally, you should make good the boreholes with sand and cement.
How Not To Inject Damp Proof Cream
There are errors that you need to avoid when injecting a damp proof cream.
DO NOT:
- Drill directly into the brick or into stone – drill into the mortar line in a continuous line
- Apply into pre-existing holes that someone else has drilled
- Inject a DPC when there is an existing effective DPC like Edwardian blue engineering bricks
- Inject if the mortar joint is of poor quality or crumbly. In this instance you will need to repair the joint and allow to fully cure before drilling and injecting the cream.
- Inject when there is a bridged cavity walls. Over time cavity walls fill up with debris and this can bridge the DPC. Moisture can then pass across and cause damage. If you inject a DPC in these circumstances it will not work.
DPC should be installed to BS 6576:2005, “Code of practice for diagnosis of rising damp in walls of buildings and installation of chemical damp-proof courses.”
Gallery of Shame
Do not drill or inject into stone or unknown substrates.

The installation in the above photograph should have either taken place from the inside into a visible mortar joint, or the external render should have been removed to find a mortar joint 150mm above ground level.
Spacing should be every 120mm (approx. half a brick).

Measure out 120mm spacings, which should coincide with every half a brick.
The spacing and hole size in the example below are correct, but the installation has been carried out on a plinth. This can direct water into the unfilled holes and cause splashback that may bridge the new damp proof course.


The injection should have been installed at a higher level and the plinth should have been angled to direct water away from the wall. Also, a coat of Microshield Ultra should be applied to protect from penetrating damp.
The Best Damp Proofing Cream
At Permagard, we've developed a professional DPC injection cream with the highest possible concentration of active ingredients. It is a market-leading solution that we're very proud of.
PermaSEAL PRO DPC Injection Cream
PermaSEAL PRO DPC Injection Cream, also available as a 10 cartridge PermaSEAL PRO DPC Injection Kit, provides permanent protection against rising damp. This high strength cream is specially formulated to allow you to efficiently create a new DPC in walls of various types, including substrates saturated with water.
How Do I Know Damp Proof Creams Works?
High-strength Damp Proof Creams have been used widely across the UK and Europe for over 25 years. Based on proven technology, they are the most reliable and efficient way to treat rising damp.
For more information on damp proofing cream or any other of our damp proofing products including physical damp proof courses, search our website or contact us on 0117 9823282.


