
How to Waterproof a Garage
Waterproofing a Garage
Whether you have a garage adjoining your house or an external garage, there's every chance you will have experienced some degree of dampness on the internal walls. This can occur, or become much worse, following construction work by neighbours with a higher land level or if you build behind your garage. It's usually at this point that people look at their options when it comes to waterproofing a garage.
Waterproofing is not considered a necessity in most cases when constructing a garage. This is because garages are usually single skin buildings that are not designed to be a habitable dry environment. However, with space a premium, many of us want to use our garages as much as possible and be safe in the knowledge that anything we store there will remain dry.
One of the most cost-effective methods for waterproofing garage walls is by using tanking slurry to prevent dampness. Tanking is commonly used in cellars and basements to prevent groundwater entering; however, tanking slurry is also highly effective at preventing damp walls in a garage. It is the cheapest and most effective method of garage waterproofing.
If completed correctly, this method will allow you to protect the contents of the garage, or you may want to use the garage for storage, even a living or office space. In this simple no-nonsense guide, we take you through all the stages of waterproofing a garage with tanking slurry.
How to Waterproof a Garage with Tanking Slurry
About Tanking Slurry
The most effective and economical way of waterproofing a garage is with tanking slurry. Occasionally this product is referred to as cementitious tanking. Tanking slurry is a specially formulated mixture designed to stop water ingress. It either comes pre-mixed or as a powder to mixed on site with clean water. The combination of Portland cements, aggregates. chemical modifiers and acrylic polymer in PermaSEAL tanking slurry combine to block the passage of water into your garage.
-
Preparing Your Garage Walls
You will need to prepare the walls of the garage before applying the tanking slurry. Make sure the walls are free from any coatings, paints, plaster, renders and dust. What you want is the original brick or blockwork, fully exposed and clean. If you come across any cracks or holes fill them with PermaSEAL Fillet Seal.

Identify any loose mortar joints and look to make good as per below image

Make good any repairs - we recommend PermaSEAL Fillet Sealant
-
Mixing the Tanking Slurry
Most tanking slurries come as a powder and require mixing on site. It's important to protect yourself when mixing tanking slurry by covering exposed skin and wearing a facemask and goggles. Always follow the manufacturer’s instructions closely and only mix enough tanking for 30 - 45 minutes as the product will become unworkable after that time.
PermaSEAL Tanking is supplied in 20kg buckets. You should start by adding the required quantity of clean water to a suitable mixing vessel. Slowly add the powder to the water whilst continuously mixing. We recommend mechanical mixing at a slow speed with a high torque drill and a plaster mixer. Mixing should be continued for three minutes after all the powder has been added to the mixing water to obtain a batter-like consistency. Allow the material to stand for one minute before remixing and then applying.

-
Wetting out the Walls
Tanking products are designed for application onto damp substrates. If your garage walls are relatively dry, you should wet out the substrate fully with clean water, making sure it is damp but with no standing or surface water before applying the tanking.
-
Wall Floor Joint
Where the wall and floor meet is often prone to leakage and therefore a potential weak point. We recommend creating a reinforced fillet joint. To do this, you should chase out the floor to a minimum of 20mm x 20mm at the wall floor joint, cutting into the wall if possible. Flush out the chase and remove any debris.
Whilst this is still damp, apply one coat of tanking slurry 100mm up the wall and 100mm across the floor. Whilst the slurry is still tacky, apply PermaSEAL Fillet Seal over the tanking slurry and into the chase creating a cove from the wall to the floor.
You do not necessarily need to waterproof your garage floor. However, if you wish to do so then follow the method outlined in our Cellar Tanking guide.

-
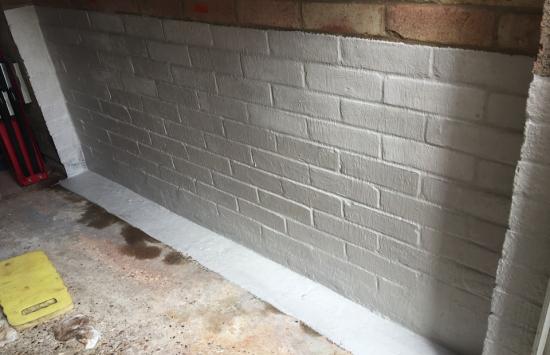
The First Coat
Tanking slurry requires at least two coats. The first coat should be applied directly to the brick or blockwork by brush in a horizontal direction. Normally we recommend applying the slurry up to one metre high, as this will combat most rising damp scenarios. Also, If the wall is retaining earth, then we suggest the tanking is taken up to one metre above ground level. You should also go down and across the wall floor joint and apply the slurry 100mm onto the floor as per the below image.

PermaSEAL cellar tanking comes in two colours – grey and white. As you can see from this series of photographs, this allows you to use a different colour for each coat so that you can clearly see where you are painting. This ensures that when you apply a second coat you cover all areas.
-
The Second Coat
It can take anything between 2–24 hours for the garage walls to be ready for a second coat. The first coat of slurry should be touch dry and able to support a second coat without pulling off. Don't wait too long though before applying the second coat - this needs to be applied within 24 hours, even if the substrate still looks damp.
Apply the second coat over the top, using vertical brush strokes. The wall floor joint should also receive a second coat.

-
Curing
After a day or two, the tanking on the walls will cure. It does so at different rates with wetter parts of the walls taking longer to fully cure.
You may notice moisture as the slurry cures. This is called ‘sweating’ and is nothing to worry about.

-
Finishing
24 hours after applying your tanking slurry to the walls and floor of the garage, you can render over the tanking surface with a breathable render. Even if the tanking looks damp or darker in certain areas, a render can still be put over the surface as the whole area will dry together.
As with most tanking slurries, PermaSEAL Tanking needs to be covered by at least a 10mm coat of three parts sharp washed sand to one part cement or PermaSEAL Renovating Plaster. After this render coat has been applied and allowed to dry, dot and dab plasterboard or a multi finish can be used. We do not recommend using paint directly on the tanking.

A render bead has been added to provide a consistent depth and a neat finish
Costs of Waterproofing a Garage
The cost of tanking a garage depends on its size and construction, but using the method outlined in this guide, waterproofing an average-sized garage (4 metres wide by 6 metres long) can cost under £150 in materials.
Tanking costs are typically calculated per square metre. PermaSEAL Tanking Slurry is supplied in 20kg buckets, with each bucket covering approximately 6.5m² per coat, depending on the condition of the surface. As two coats are required, this means one bucket effectively covers 3.25m².
At £29.50 per bucket (excluding VAT), that works out at approximately £9.08 per m² for two coats. Tanking two 6m-long walls and one 4m wall to a height of 1 metre gives a total area of 16m². This requires five buckets, costing £147.50 excluding VAT. You’ll also need a fillet sealant for the wall-to-floor joints, but overall, this remains a highly cost-effective way to waterproof a garage.
If you are planning to convert the garage into a living space, you may want to consider using a damp proofing membrane system or a cavity drainage membrane system. This has its own associated costs that are considerably higher than tanking.
Permagard – Garage Waterproofing Products at Low Trade Prices
If you have any unanswered questions around waterproofing a garage or the tanking process, then call our technical team for free advice on 0117 982 3282. To find out more about cavity drainage membranes and how they work then feel free to contact us too. We are more than happy to share our 35 years+ of waterproofing knowledge.
Find out How to Tank a Cellar or check out our guide to garage conversions.
Related Products
- PermaSEAL Tanking Slurry in White
- Permagard Cementitious Tanking products
- PermaSEAL Fillet Seal
- Professional Tanking Brush
Many thanks to Richard Uphill for providing the images for this guide.


