
Tanking a Cellar – How to Guide
How to Tank a Cellar
Cellars are often damp and unusable beyond storing the odd bottle of wine and old tin of paint. If you want to make full use of your cellar or basement, then you will need to keep it dry. Tanking systems provide an impermeable waterproofing coating to the walls and floor, helping keep cellars dry.
When it comes to waterproofing a basement with damp walls you have two main options:
- Install a cavity drainage system, or
- Cellar tanking.
There is some confusion about exactly what constitutes cellar tanking. The term has come to refer to above ground damp proofing as well as cavity wall membranes as part of a basement drainage system. In this article, we are going to focus on cellar tanking as per the following definition.
What is Cellar Tanking?
Cellar tanking or basement tanking refers to the application of a liquid waterproof coating (tanking slurry) to the walls and floor of a cellar. It is used to treat damp walls by preventing water ingress, effectively making the walls permanently watertight.
Damp walls are common in cellars because the walls are below ground. Water from the retaining earth can make its way through the walls and into the cellar. When this moisture passes through the wall, it can also carry salts and minerals with it. Damp walls are cold which creates issues with condensation and in turn mould. Tanking slurry is designed to deal with these issues. It is applied directly to damp walls. When the tanking slurry cures, it forms an impermeable waterproof barrier, preventing water ingress and damp.
It’s important to point out that unlike a cavity drain system, tanking slurry blocks water from entering your cellar rather than allowing it in and controlling it to an evacuation point.
Tanking Slurry
The most effective way of tanking your basement or cellar is with tanking slurry. You may sometimes see this referred to as cementitious tanking. Both names refer to the same product - a specially formulated mixture designed to be applied to cellar walls to stop water ingress. It either comes premixed or as a powder to be mixed on site with clean water.
Some people may recommend tanking a cellar with a bitumen coating, but this method is not suitable for tanking an entire cellar or basement. Bitumen coatings are more suitable for smaller above ground areas and external waterproofing.
How does tanking slurry work?
Tanking slurries are a special blend of Portland cements, aggregates and chemical modifiers that work together to block the passage of water. Our PermaSEAL tanking slurry contains an additional acrylic polymer that improves strength, bonding and abrasion resistance.
Tanking Cellar Walls
When it comes to tanking wet or damp walls, you need to prepare thoroughly before applying the tanking slurry. There are several steps you should take to minimise the risk of the tanking failing.
How to Tank Your Cellar with Tanking Slurry
Preparation
You need to prepare the masonry surfaces thoroughly. In older homes, this can take a long time, but preparation is key to a watertight system and well worth the effort.
The first job is to ensure that you can get to the full surface of all the walls (removing all shelves and other items) and that the floor is also clear.
You then need to hack off any plaster and render from the cellar walls along with any previous coatings (bitumen, paints etc) right back to the original masonry. Rake out any old mortar joints and any other loose material before finally making sure the walls are dust free. You will then need to carry out repairs on any existing cracks or holes with PermaSEAL Fillet Seal.
If there are (or have previously been) issues with high levels of salts, it is recommended that you apply a Salt Inhibitor to the cellar walls to prevent any salts from compromising your tanking.
Note: For tanking to work, the brickwork needs to be stable so that it can cope with the build-up of water pressure. If this is in doubt, then you will need to take action to ensure the walls can resist water pressure.

Check for Seepage
Once you have removed all materials from the walls, you need to check if there is active water seeping from the wall. If there is evidence of water seepage, you will need to tap off this water pressure where necessary.
Wall floor junction or fillet joint
When tanking a cellar, we always suggest that the walls and floor are coated to create a waterproof box. The point where the wall and floor join can be a potential weak point in any system, we therefore recommend creating a reinforced joint.
How to create a wall floor junction or fillet joint
At the wall floor joint, chase out the floor to a minimum of 20mm x 20mm cutting into the wall if possible. Flush out the chase and remove any debris. Whilst this is still damp, apply one coat of tanking slurry 100mm up the wall and 100mm across the floor. Whilst the slurry is still tacky, apply PermaSEAL Fillet Seal over the tanking slurry and into the chase creating a cove from the wall to the floor.
Mixing the Tanking Slurry
Make sure you keep your skin covered and wear gloves, a facemask and goggles before mixing the tanking product. Tanking slurry is alkaline in its powder form, therefore you need to avoid contact with skin or eyes and avoid inhalation of the powder.
Most tanking slurries come as a powder and require mixing on site. When mixing on site, you will need to follow the manufacturer’s instructions. Only mix enough tanking that can be used within 30-45 minutes, as the product will become unworkable and will have to be disposed of.
PermaSEAL Tanking is supplied in 20kg buckets. You should start by adding the required quantity of clean water to a suitable mixing vessel. Slowly add the powder to the water whilst continuously mixing. We recommend mechanical mixing at a slow speed with a high torque drill and a plaster mixer. Mixing should be continued for three minutes after all the powder has been added to the mixing water to obtain a batter-like consistency. Allow the material to stand for one minute before remixing and then applying.
Applying the Cellar Tanking
Cellar tanking products are designed for application onto damp substrates. If your cellar walls are relatively dry you should wet out the substrate fully with clean water, making sure it is damp but with no standing or surface water before applying the tanking.
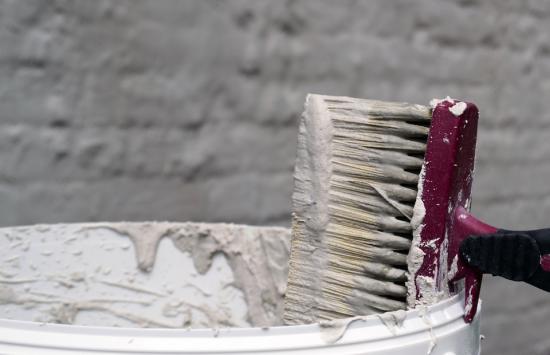
Tanking slurry requires at least two coats. The first coat should be applied directly to the masonry, brick or concrete surface by brush in a horizontal direction. You should go down and across the wall floor joint and apply the slurry a 100mm onto the floor.
The walls are usually ready for a second coat after a few hours, depending on conditions. Before applying it, make sure the first coat is touch dry and firm enough to receive the second coat without pulling away or becoming damaged during application.
For optimal bond performance, the second coat must be applied within 24 hours of the first. Apply it in vertical strokes, going over the same areas - including the wall-floor joint - to ensure complete coverage.
If you are going to leave the tanking exposed for some time before rendering, you should apply a third splatter coat after approximately 1 hour to ensure an adequate key later.
Note: PermaSEAL cellar tanking comes in two colours – grey and white – so that you can use a different colour for each coat so that you can clearly see where you are painting. This ensures that when you apply a second coat you cover all areas.

Tanking a Cellar Floor
It is important to tank the floors of the cellar as well as the walls. We strongly recommend that you tank the cellar floor once you have fully tanked all the walls.
The same method is followed when tanking a floor. You should still apply two coats, horizontally and then vertically lapping over the fillet joint.
When it comes to a finish, tanking coatings should always be protected so never left exposed. You should apply a floor screed (this can be self-levelling). You can then tile or install other floor finishes on top of the screed if you wish.
Curing
You should leave the second coat to cure thoroughly - this takes between 24 and 48 hours. The tanking on the walls will cure at different rates. Wetter parts of the walls will take longer to fully cure.
You may notice moisture as the slurry cures. This is called ‘sweating’ and is nothing to worry about. It is a natural part of the curing process that normally occurs in the early drying stages and is caused by water vapour condensing onto cold surfaces. The level of sweating will vary according to how much ventilation is available and any type of heating used.
Finishing and Decorating
After applying your cellar tanking to both the walls and floor, you can then look at finishes and decorating. You will need to add a breathable render before being able to decorate. After 24 hours, you can render over the tanking surface. Even if the tanking looks damp or darker in certain areas a render can still be put over the surface as the whole area will dry together.
As with most tanking slurries, PermaSEAL Tanking needs to be covered by at least a 10mm coat of three parts sharp washed sand to one part cement or PermaSEAL Renovating Plaster. After this render coat has been applied and allowed to dry, dot and dab plasterboard or a multi finish can be used. We do not recommend using paint directly on the tanking.
Because the substrate behind the tanking surface will never dry out, it is very important that any redecoration doesn’t act as a vapour barrier. Only vapour permeable materials such as trade emulsions and ordinary wallpapers should be used. Gloss paints, vinyl emulsions, together with vinyl and washable wallpapers should be avoided as these will ‘trap’ moisture behind the decorated surface causing future problems. Any redecoration within 12 months after the completion of the works should only be regarded as temporary.
Cellar Tanking Cost
To work out your cellar tanking costs, you need to look at all the products required, the quantities, and also factor in labour costs. As a guide to costs, we'll take you through calculating the tanking costs using PermaSEAL grey tanking slurry. You would need to also add on the cost of fillet seal for wall/floor joints.
How much does Cellar Tanking cost?
The cost of tanking a cellar depends on the size of your cellar, the type of substrate and the extent of the damp.
Cellar tanking costs are typically calculated per square metre and can vary depending on the condition of the substrate. PermaSEAL Tanking Slurry is supplied in 20kg buckets, with each bucket covering approximately 6.5m² per coat. Since two coats are required, one bucket effectively covers 3.25m² of treated surface.
At £29.50 excluding VAT per bucket, this works out at approximately £9.08 per m² for two coats using the lowest coverage estimate. For example, tanking four cellar walls, each 5 metres long and 2 metres high (a total of 40m²), would require two coats, equating to 80m² of total coverage. Based on 6.5m² per bucket per coat, this would require 13 buckets, costing £383.50 excluding VAT.
If you also plan to tank the floor of a 5m × 5m cellar (an additional 25m²), you’d need to cover 50m² with two coats, requiring a further 8 buckets at a cost of £236.00 excluding VAT.
In total, tanking both the walls and floor in this example would require 21 buckets of tanking slurry, with a total material cost of £619.50 excluding VAT.
Permagard – Stockist of Cellar Tanking Products
At Permagard we stock a wide range of cellar tanking products including grey and white tanking slurries at low trade prices.
If you have any questions about tanking a cellar or installing a basement waterproofing system, then we are more than happy to provide free technical advice. Call us on 0117 982 3282 today.
Related Content
Related Products


