
Why Tanking Slurry Fails and How to Fix It
Have you tanked your basement only for damp to reappear? Unfortunately, tanking can fail. This is normally related to an issue installing it or an untreated underlying problem. We’ll walk you through how you can identify each of these and what you can do to resolve failed tanking.
- How can I tell my tanking slurry has failed?
- What causes tanking slurry to fail?
- How to fix your tanking
- Type C drained protection
How can I tell my tanking slurry has failed?
Failed tanking is normally easy to spot. You might notice moisture or damp on the wall, blistering or peeling paint, salt deposits, tide marks or a damp smell. These visual tests are normally enough to tell if your tanking has failed in a domestic setting. You can also use diagnostic tools, like moisture meters, that will give you a reading based on the presence of moisture. Note that damp meters aren’t always accurate, and if you’re uncertain about damp ingress, you can always consult a specialist.
What causes tanking slurry to fail?
There are a few different reasons tanking slurry can fail. We break down each one and explore why they can happen.
Incorrectly prepared surface
Tanking needs to be applied to a properly prepared surface. This means all paint and previous coatings, including nails and timber, have to be fully removed and the surface made good before the tanking is installed. This means removing loose material, laitance, dust and previous coatings so you’re applying to clean brickwork, concrete or masonry.
If the surface isn’t prepared, the tanking is less likely to adhere properly, which will eventually lead to failure.
Issues with application
There are some issues during the tanking application that can cause problems further down the line and lead to system failure, including:
- The surface being too dry or wet: When applying tanking slurry, the surface should be damp but not wet. If it’s too dry or damp, the slurry won’t properly adhere to the contact surface.
- Too long between coats: There shouldn’t be more than 24 hours between coats.
- Joints between wall and floor: Rigid angles, such as where a wall and floor meet, can be weak points. It’s essential to create a fillet at the junction.
- Applied a single coat: Tanking slurry requires two coats to work. If only a single coat was applied, or if it was applied too thinly, the system won’t work as intended.
- Curing: Curing can be a false flag - giving the appearance of damp while the process happens. Sweating, where moisture forms on the surface of the tanking, can happen as curing takes place. Once curing has finished, this should stop.
Underlying damp issue
Although tanking is designed to prevent water ingress, if there’s a serious issue that’s causing severe damp, tanking is just papering over the cracks. If damp is entering your property due to a building fault, it’s important to deal with this before tanking.
While tanking can be used above ground, it’s most commonly used in underground spaces. Hydrostatic pressure will be the most likely cause of damp ingress.
Hydrostatic pressure
Hydrostatic pressure is the force applied by water in the ground surrounding a basement or underground structure. If this becomes too high, it can force water through the tanking / exploit any weaknesses, damaging the slurry in the process.
If your basement is being affected by hydrostatic pressure, a Type C system is generally the only maintainable solution, as it safely drains and evacuates water outside your property.
Structural movement
Once it sets, slurry becomes rigid. Any movement in the walls or floors can cause it to crack and ultimately fail.
How to fix your tanking in four steps
Once the system has failed, it needs to be removed and replaced. The good news is that if you suspect that there are multiple issues with the application, they can all be remedied at the same time.
Step one: Identify the cause
If your tanking has failed, it’s likely to be one of the issues we explored in the previous section.
If you can’t remember making a mistake during application or surface preparation, there are no cracks, and you’re not sure if there’s an underlying issue with hydrostatic pressure, penetrating damp or condensation, you should consult a damp specialist who can properly diagnose the problem.
If you make repairs and aren’t sure why failure occurred in the first place, it may just fail again if there is an untreated root cause.
Step two: Remove failed tanking slurry
Removing failed tanking is a labour-intensive job. Using an SDS hammer drill with a chisel bit will help you remove the hardened slurry without destroying the underlying sound substrate. However, for old or delicate brickwork, greater care needs to be taken. Using a manual chisel and a wire brush is a safer way to remove the tanking without damaging the wall beneath.
Removing the old slurry will create a lot of dust, so we’d recommend using a vacuum attachment on tools where possible and consider using a dust extractor. You should also use appropriate PPE, including a dust mask, goggles and gloves.
Step three: Repair substrate where necessary
We looked at the importance of preparing the surface before tanking above. As a reminder, all loose material, paint and other coatings need to be removed. But even when this has been removed, concrete blocks, surfaces with entrapped air or uneven stone walls may require a 3:1 sand/cement scratch coat with PermaPROOF waterproofer. This will create a sound, even base ready for tanking to be applied.
Step four: Reapply tanking
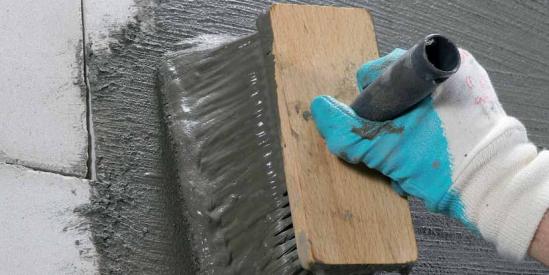
We’d recommend using PermaSEAL Tanking Slurry. This is an easy-to-apply, long-lasting solution. To apply:
- Wear protective gloves, overalls and a mask.
- Mix the slurry powder with water.
- Apply the first coat horizontally. This needs to be done quickly, as the slurry begins to set after around 45 minutes.
- Apply the second coat vertically. Wait until the first coat is dry, but it should be applied within 24 hours.
For a comprehensive guide to tanking a wall, see our complete guide to wall tanking & waterproofing.
Our tanking slurry is available in grey and white. We generally recommend using one colour for the base coat and another for the second coat, as this allows you to see clearly if the entire surface has been covered.
Type C drained protection
In many instances, correctly applied cementitious tanking is sufficient to protect below-ground structures. If it's failed due to increased hydrostatic pressure or the risk of basement flooding and corresponding damage, a Type C drained system is highly recommended.
A Type C system will capture any water entering the basement and safely evacuate it outside the property. This system comprises a Cavity Drain Membrane, Drainage Channels and a Sump Pump.
Find out more with our Type C Waterproofing Guide.
Permagard: Your tanking experts
We have more than 35 years of experience supplying damp proofing and basement waterproofing products. Our popular PermaSEAL Tanking Slurry is just part of our comprehensive range of cementitious tanking products.
If you need advice about any of our products or would like advice or support about your tanking project, our team is always happy to help.


