
Type C Waterproofing Guide - How to Install A Cavity Drain System
In this article we’re going to explain everything you need to know about cavity drain waterproofing systems - also known as Type C waterproofing systems by the British Standard for waterproofing BS8102:2022.
We explain how cavity drain waterproofing works, the products you’ll need, and the steps you’ll need to take to install it successfully.
- Take me to How to Install a Cavity Drain System
What is Type C waterproofing?
Type C waterproofing is all about providing structures with ‘drained protection’. In reality, this relates to the installation of cavity drain systems. They are a popular retrofit option for basements and cellars, and increasingly installed in new builds too.
Drained protection is required because any earth-retaining wall is subject to hydrostatic pressure - this is when water pressure from the outside exerts itself on a structure. The external basement wall provides some primary resistance, but if there are any structural weakness then water may enter the property and cause flooding and damage.
'Type C drained protection' makes sure that basements and below ground structures are safe in the event of water ingress. It involves covering the floors and walls of your structure with a specially designed cavity membrane and installing a drainage system to channel any water that does enter safely out of your property. This means that any possessions remain unaffected in the event of water coming through the walls.
When are Type C cavity wall waterproofing systems used?
Cavity wall waterproofing systems are commonly used for remedial refurbishment projects such as basement conversions or renovations. They are also used in new build construction.
In certain circumstances you may be required to consider the use of combined protection. This would normally be specified if the assessed risks are deemed to be high or the consequences of failure are too high. If this is the case for your project, you may need to consider the use of the following types of protection alongside Type C (drained) protection:
- Type A (barrier) protection - internal or external tanking
- Type B (structurally integral) protection
What are the benefits of Type C cavity drainage systems?
There are lots of benefits to installing a cavity drainage system in your property.
1. It offers reliable protection for your property and possessions
This type of waterproofing system provides reliable, long-term protection to your property, protecting your possessions and home from water ingress long into the future.
2. You don’t need to make external changes to the property
Unlike some Type A and Type B waterproofing systems, Type C cavity waterproofing doesn’t require you to make any external changes to your property’s structure. This means you can achieve a high level of protection without the need for intensive labour and building work, and significantly less investment.
3. It offers a waterproofing solution for new constructions as well as refurbished properties
For newer properties built on land that is more susceptible to flooding, Type C cavity drainage systems provide peace of mind. In particular, it reassures those property owners in areas that are prone to flooding, with high water tables, and bad weather. For older buildings, cavity wall waterproofing provides robust waterproofing for homeowners who want to convert their basements and cellars into liveable and usable spaces.
They can also be used on a whole range of other below-ground structures
4. The drainage system removes excess water from the property preventing structural damage
Cavity drain membrane systems safely deal with water that has entered a building. It’s a controlled drainage system. By removing the water, the cavity drainage system prevents pressure from building up against the internal wall structure.
The air gap between the membrane and the wall also allows the building to breathe, helping it to dry out after being subject to water ingress.
Remember - Type C pumped systems should be designed to cope with worst-case water ingress. If drainage capacity is exceeded, this may result in flooding. Most Type C systems are only designed to control and manage minor water ingress and seepage into a structure.
How does basement cavity drainage work?
Cavity drainage system waterproofing works by safely and efficiently channelling water ingress to a suitable evacuation point.
Cavity drain membranes are applied to the basement’s walls and floor, making sure that no area is left uncovered. A small gap is created between the membrane and the wall or floor, due to an egg-cup profile. This allows any excess water to drain down the cavity between the membrane and wall, relieving the water pressure.
Any water that enters the basement structure travels down behind the membrane into a drainage channel system. The water hits the drainage channel which is then diverted to a sump pump chamber beneath the floor slab. Pumps then pump the flood water out of the property to a suitable outlet such as an external drain. This protects your property and possessions from damage. In some designs, water will be channelled to other suitable drainage outlets without the need for a sump pump system.

Can I install a cavity waterproofing system myself?
Installing a cavity drain waterproofing system is generally not a DIY task. A reliable and compliant installation requires a professional who understands the complete specification and installation process.
Any mistakes made during the installation process may result in weak patches. This will make it prone to future flooding, as pressure will build up at the weak spots. This risks damage to the property, making any protection ineffective.
So, if you’re a homeowner, it’s always best to contract a professional to install your cavity wall waterproofing. We’ve put together a number of relevant questions to ask a basement waterproofing contractor to help you.
To help you understand the basic installation process, we’ll highlight the steps needed to install a Type C cavity wall drainage system.
How to install a cavity waterproofing system
In this part of the guide, we’ll explain step by step how to install your cavity drainage system. But before you install the system, you need to understand which products you’ll need.
The products you need for your Type C waterproofing system are:
- Basement floor membranes
- Basement wall membranes
- Membrane fixing plugs - including Cob Plugs for substrates where a good fixing is hard to achieve.
- Basement drainage channel system
- A sump pump, if required
- Battery back-up pack, optional
At Permagard, we stock all the products you’ll need to install your cavity waterproofing system. Our range of products will help you install long-lasting cavity waterproofing in the most efficient way possible.
Choosing the Type C waterproofing membrane
You’ll need two types of membranes - wall membranes and floor membranes.
Wall membranes
There are many different types of wall membrane you can choose from, depending on your needs.
At Permagard, our PermaSEAL waterproofing membranes suit a variety of different finishes and drainage capacities. This means you can use them in most basements. You can apply renders, dot and dab plasterboard, batten and board to them. They can be used behind false walls or metal trunking too.
Floor membranes
You’ll also need a separate floor membrane for the basement floor. These membranes will tend to have larger stud profiles, like the PermaSEAL Floor Cavity Drainage Membrane. This is to cope with large volumes of water ingress.
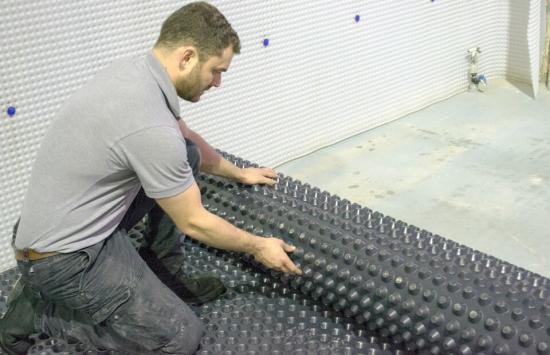
Installing the wall membranes
Depending on which membranes you’re using, you’ll have specific installation instructions. While you must refer to these when installing, we’ll detail the installation process for our PermaSEAL range below.
Make sure that the wall is clean, free of debris and with all defects repaired. Cavity drain membranes can be installed in two ways. The best option normally depends on the height of the wall where you are installing the membrane. The membrane can either be unrolled and wrapped around the room or they can be installed like wallpaper overlapping every edge.
Start by rolling out the membrane along the wall with the stud profile facing the wall. It is important to keep the membrane level, so we suggest using a laser level and levelling a row of studs on this.
To fix the membrane to the wall, drill holes through the membrane and insert the correct plug for the membrane / situation. Put the plugs in the centre of the hole and hammer these plugs into the wall to secure it. This will leave a small gap between the wall and the membrane which is where any water will travel down to the basement drainage channel.
Plug Fixing Centres and Spacing
The number of plugs and the plug spacings will depend on two factors:
1. the type of membrane you are installing (mesh or non-meshed)
2. the type of finish you are installing
For a meshed membrane you will require a minimum of 15 plugs per m² which is approx. 250mm spacings however this could decrease at corners and other junctions or details. If any sections do not look tight, additional plugs should be installed.
For a clear membrane, you can install in a few different ways, depending on the finish being applied in front of the membrane.
- Independent stud wall - Fixings can be nominal with centres at every 900-1000mm however this could decrease at corners and other junctions or details.
- Timber battens - normally 600mm centres vertically and 400mm horizontally however this could decrease at corners and other junctions or details.
- Fixed metal track - 800mm centres vertically and 600mm horizontally however this could decrease at corners and other junctions or details.
- Independent masonry wall - Fixings can be nominal with centres at every 900-1000mm however the wall may need to be tied into the masonry behind the cavity drain membrane with wall ties therefore special plugs and ties will need to be installed at 900mm centres to accommodate this after the membrane is installed.
With a clear membrane, it is not essential to get the membrane tight to the wall however, additional plugs should be installed if required. The above is for guidance only and centres may need to be moved depending on what the installer of the finishes requires.
Remember: using a laser level will help keep the membrane straight which will make installing it a lot easier. It may also be of benefit to dub out with sand and cement any walls that have undulations or voids in them to make life easier.

Jointing membranes
You need to overlap subsequent sheets of wall membrane with the previously installed membrane. You also need to seal these joints to prevent areas of weakness.
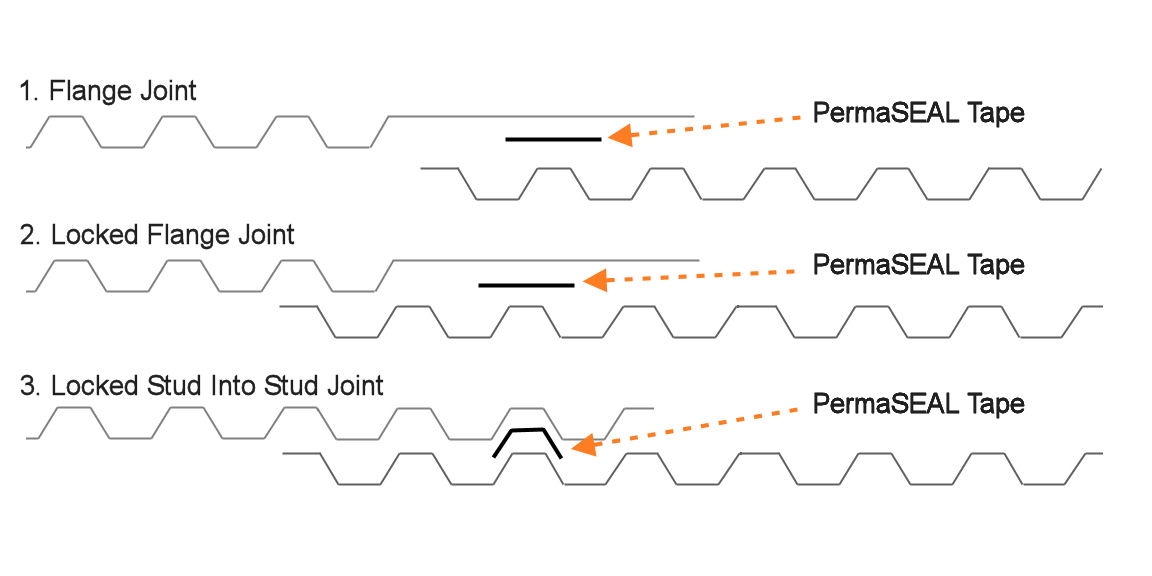
There are three standard types of sealed joints that can be made:
- Flange Joint: a Flange Joint should be used whenever the flat flanged edge (the area without studs) of the membrane is available. Consecutive membrane widths are fixed to the walls or laid on the floor so that the flange lays over the top of the studded edge of the previous sheet. The flange must cover a minimum of two rows of studs.
Using PermaSEAL Jointing Tape, unroll this onto the studded edge sheet, beneath the flange. The Tape should be positioned between the last two rows of studs on the flat section, and pressed firmly into place. It is easier to apply the tape to the inner surface of the flange of the next sheet. Clean the flange and the face of the last sheet with a clean rag. When you have fixed the new sheet level with the correct overlap, pull off the backing paper from the tape and peel down whilst applying pressure to the flange. Once all the backing paper has been removed, apply more pressure with the palm of your hand to further seal the whole of the joint.
- Locked Flange Joint: Similar to the ‘Flanged Joint’ but has the first line of studs of the next sheet of membrane interlocking with the last line of studs on the previous membrane sheet. This method guarantees that you install membranes square to the previous sheet and is useful on large floors or where the wall membrane is fitted horizontally and a horizontal joint is required.
- Locked Stud into Stud Joint: If a ‘Flanged Joint’ is not possible, and where the studs from each sheet line up correctly so that they interlock into each other, a ‘Stud into Stud’ joint is possible.
The overlap should be a minimum of three studs. PermaSEAL Tape is used to achieve a flat joint. Attach the PermaSEAL Tape to the flat area between the last two studs of the previous sheet of membrane with the backing tape still adhered. Carefully remove the backing tape and push the next sheet studs into the previous sheet studs to create the flat joint.
Corners
For the basement wall corners, the membrane should be pressed into the corner and fixed tight. You will need more fixings at these points. It is also essential that the membrane is wrapped around the corner and joints do not happen within 300mm of the corner itself.
Installing basement drainage channels
Around the perimeter of the basement and across the floor below the flooring membranes you’ll need to install drainage channels. These are designed to channel any water ingress to a sump chamber or suitable drainage outlet. PermaSEAL’s basement drainage channels all feature engineered 19mm holes that allow any water to freely pass into the channel.
PermaSEAL Drainage Channel Systems
Permagard provide straight two metre perimeter drainage channels with upstands and without upstands, along with corner pieces, T-junctions, straight connectors and end caps. To make the system maintainable and comply with BS:8102 2022, we also stock jetting eye inspection points.
Your design should include these drainage inspection points every 10 to 12 metres. They allow you to install jetting eyes to flush out any debris and potential blockages, cleaning and maintaining your drainage system.
Our PermaSEAL range of drainage channels and connectors slot together without the need to tape joints. They are also designed with a smooth flush interior to avoid silt and salt build up within the channels and at joins.
Immediately after the installation of a drainage system, flush it out using the jetting eyes to remove any debris that might have fallen in during installation.
There are lots of different products designed to help you with the design and installation of your basement drainage system. Take a look at our range of drainage system products.

Methods for laying basement drainage channels
Our PermaSEAL drainage channels are installed at the bottom of the cavity drainage wall membrane at the wall floor junction. Our floor drain channels do not have an upstand so can be laid across the floor when required. Both types of drainage channel can be laid in the following four ways:
Above the existing slab with insulation
The drainage channel should be laid around the perimeter on top of the existing slab (it needs to be level) and directed to the sump chamber or drainage outlet. The area of the floor enclosed by the drainage channel should then be raised by installing 50mm Fibran XPS insulation.
Above the existing slab with a sacrificial screed:
A preformed gap of 50mm deep by 100mm wide from the wall should be created around the perimeter before the concrete is poured to 50mm deep to lift the slab to the top of the channel.
In the existing slab:
The channel should be laid in a trough cut into the basement slab. Generally, a gap of 50mm deep by 100mm wide from the wall will be sufficient. If a larger recess is created, the channels should be laid in a minimum of 20mm aggregate.
New slab:
A preformed gap of 50mm deep by 100mm wide from the wall at new floor level should be created around the perimeter before the concrete is poured. A structural engineer should be consulted to determine the thickness of the slab at the perimeter below the channel.
Installing the sump pump
You need to install the sump pump into the slab of the basement or cellar. These are generally installed under the floor slab. The sump chamber will fit in the hole/recess that should have been created in the slab.
Some are backfilled with concrete to form part of the floor slab with an access cover for maintenance purposes. However, others can be connected above the slab.
At Permagard, we stock PermaSEAL sump pump systems. We sell both single and dual pump systems. The additional pump can deal with higher volumes of water as well as allowing one to function as a backup in case of failure or during maintenance.
Find out more about Sump & Pump systems and their purpose or dive into our complete sump pump installation guide.
Installing the floor membranes
After you’ve installed the wall membranes and the drainage channel around the perimeter of the structure, it’s time to apply the floor membranes. Again, specific installation guidelines will depend on the membrane manufacturer. For PermaSEAL floor membranes, follow this guidance:
It is essential that there are no undulating surfaces or depressions in the floor. In new build or whenever floors are being replaced, the floor slabs can be designed and constructed at a 1 or 2 degree fall towards the water collection facility i.e. sump chamber.
Where an existing solid floor is to be retained a sand/cement screed can be laid over the entire floor gently sloping towards the sump. In all cases the floor should always be tested by spraying with a hose, to ensure that all water finds its way to the water collection point before laying the floor membrane.
Before installing, remove all loose debris and dust from the floor. If mould or fungi is present, this should be treated before installing the floor membrane. The floor’s surface of new or repaired concrete should also be treated with Lime Inhibitor to reduce the risk of free lime or mineral salts building up.
Ensure that your drainage system is in place and connected to a drainage outlet point or to the sump pump. This needs to be well positioned in the basement, and part of your cavity drain design. A common failure with Type C waterproofing systems is due to poor drainage because of poor design and/or installation.
When the floor is prepared and the drainage channels are installed, you can roll out the floor membrane with the dimples/studs facing downwards. The membrane should be rolled out to the drainage channel upstand and terminated. Subsequent lengths should be laid and overlaps jointed as per the manufacturer's instructions.
Any protrusions through the floor membrane such as waste pipes etc should be sealed to the floor membrane with corner strip or over strip.
Jointing wall and floor cavity drain membrane
At this point the junction is designed to be sealed with corner strip. This 150mm wide single sided over tape is applied 75mm over the floor membrane and 75mm onto the drainage channel upstand. Optionally, a second strip can be applied 75mm over the drainage channel upstand and 75mm onto the wall membrane to give a full seal.

Type C waterproofing protection and maintenance
Once the Type C system has been successfully installed, you can carry on with the rest of your basement refurbishment. It’s a good idea to schedule the system’s first service visit within three months of being installed to highlight any problems before they become critical. This will also allow you to remove any debris that might have built up in the drainage channels during the installation.
Remember that your Type C waterproofing systems should be inspected at least once a year. Depending on how much water ingress you expect over a year, you may want to arrange bi-annual check ins.
How much do cavity drain systems cost?
The cost of cavity drain systems depends on the size of the basement or structure you want to waterproof, the finishes required and the cost of professional installation.
Cavity drain systems have a lot of benefits over other tanking methods and can be a relatively cost-effective solution to waterproofing your below ground structure.
A consideration must be made for servicing your sump and pump system which after the first year should be done annually. This can cost between £200-£400 per system however a majority of service companies also offer emergency cover on top of this as a monthly figure.
For a 5m x 5m basement with a wall height of 2 metres and a final finish of baton and board plasterboard, you could be looking at the following list of products (prices ex. VAT):
- Wall membrane - PermaSEAL 8 40m Kit @ £299.00
- Floor membrane - PermaSEAL 8 ECO X Membrane 2m x 20m @ £120.00
- 10 x PermaSEAL Drainage Channel 2m lengths @ £24.95 each
- 8 x PermaSEAL Drainage Channel Straight Connectors @ £5.50 each
- 4 x PermaSEAL Drainage Channel Corners @ £12.30 each
- 4 x PermaSEAL Drainage Channel Jetting Eyes @ £11.60 each
- 1 x PermaSEAL Drainage Channel T Piece @ £15.75
- 1 x PermaSEAL Drainage Channel Adaptor @ £8.50
- 1 x PermaSEAL Sump and Dual Pump System @ £715.00
Total: £1,547.35 ex VAT for the products only.
Prices accurate as of July 2025 and subject to change.
PermaSEAL - Cavity Drainage Systems
Our PermaSEAL cavity drain membranes are trusted by professionals to get the job done. Each product represents quality and value for money.
We’re proud to offer PermaSEAL as a complete solution - from the range of products to the documentation, to the support we provide. Rigorously tested, and made to last and with zero compromise, our PermaSEAL range gives you the confidence you need.
Membranes
- PermaSEAL 8 Mesh 40m²
- PermaSEAL 8 Clear 40m²
- PermaSEAL 8 Eco Cavity Drain Membrane for Floors & Walls 40m²
- PermaSEAL 20 Waterproof Floor Membrane 20m²
Plugs
Drainage Channels
- 2-metre floor drain drainage channel without upstand
- 2-metre drainage channel with upstand
- Corner Connector
- T-Connector
- Jetting eye
- End stop
- Drainage channel connector
- Drainage adaptor
Tapes
Permagard – Cavity Drain Membrane Specialists
Permagard has excellent stock availability across our range of cavity drain basement waterproofing products. We stock everything you need to install this Type C waterproofing system, and can advise you on how to install it, too.
We offer delivery within one to three days. If you’re looking for cavity drain waterproofing supplies near you, we have a depot just off the M5 where you can click and collect from our trade counter.
If you need advice about installing Type C cavity waterproofing systems, our technical advisers are here to help. Simply call us on 0117 982 3282.
For gas sumps or foul sump pump systems, explore the categories.

-

-

-
 PermaSEAL 8 Eco Cavity Drain Membrane for Floors & Walls 40m²More Info£120.00 Ex VAT£144.00 Inc VAT