
How to Repair Cracks in Walls
If you see cracks in your external walls then you may well be worried that the structural integrity of your home is at risk. There is no need to panic, however, as the majority of cracks are not symptomatic of a more serious underlying structural problem. Most of the time, these cracks can be easily repaired. This guide provides information around determining the type of crack you have, what course of action to take, in particular how to repair your walls using crack stitching.
What causes cracks in walls and what are the different types?
Cracks appear in a wall for a number of reasons:
-
House settling cracks
These can occur as a new house ‘settles’ or when the construction materials expand and contract overtime with environmental changes.
-
Building movement cracks
They can also be caused when the foundations of the house move. It is important to establish the root cause and then to take professional advice before making a judgement as to what action to take.
-
Minor cracks
Some minor cracking occurs naturally and there is no need for concern or action although it is always worth monitoring them closely for any change. There are other cracks that will need some form of repair work and others that will need more immediate and drastic attention.
Categorising cracks in walls
The BRE (Building Research Establishment), who offer expert advice for the built environment sector, produced the BRE Digest 251 Assessment of Cracks in Houses. In this document, they identified six categories for cracks, which they describe along with the recommended crack repair method. You can see the categorisations below - italicised text indicates ease of repair:
| Damage Category | Description of Damage |
| 0 |
|
| 1 |
|
| 2 |
|
| 3 |
|
| 4 |
|
| 5 |
|
Usefully, the BRE link the width and number of cracks to the appropriate type of repair. The first three types of crack - 0, 1, 2 – only require redecoration. Those cracks described in 3 and 4 require more major work, but it is only the fifth type of crack that indicates severe structural damage and needs urgent attention from a professional surveyor.
It is important to point out that even with smaller cracks, you should monitor them over time in case they increase in width. Any increase could be indicative of a more serious underlying issue. Those cracks that emerge over a short space of time, even small ones, are also potential causes of concern when compared to those that have been there for years.
Consult a professional structural engineer to confirm any diagnosis as well as an appropriate course of action.
Important Questions
If you consult a structural engineer or building professional, they will want to know the following:
- How long have the cracks been there?
- Are they getting wider?
- Are they increasing in number?
It is worth making notes as to when any new cracks appear and take measurements. A pencil line can be drawn across the crack to monitor its movement.
Identifying Cracks in External Walls
There are two main types of crack that can appear in your masonry walls – vertical and stepped.
Vertical Cracks in External Walls
Vertical cracks usually occur in foundation walls when there is insufficient support below. The main reason for this lack of support is when the soil beneath the foundation has not been properly compacted and compresses or even washes away.
The following is an example of a vertical crack:

Stepped Cracks in walls
Stepped cracks usually follow mortar joints and are most common near the corners of buildings. They usually occur through wall movement related to foundation movement including subsidence.
The following is an example of a stepped crack:

Horizontal Cracks in walls
Horizontal cracks in external walls are always a result of wall tie corrosion. But don’t worry - we have a complete guide that takes you through identifying and replacing corroded wall ties.
Why Are My Walls Cracked?
Cracks in walls can occur for a number of reasons. With new build houses, cracks can appear as the house ‘settles’ (settlement of soil due to the weight of the building). In older properties small cracks can be fairly common as building materials shrink overtime. We have divided the main causes of cracked walls into structural and environmental factors:
Structural explanations:
- Subsidence – Subsidence is the downward movement/sinking of the ground that supports a building. These changes in ground conditions under and around a building can cause walls to move and cracks to appear. Subsidence is more common in areas with clay soil (mainly in the South of England), which can shrink in dry weather. Sandy and silty soils in the foundations can experience leaching when minerals get washed away. For more on Subsidence, read this guide from the ABI.
- The shrinking, drying out and degradation of construction materials like timber, plaster, and concrete.
- Structural failure – if an element of your house has been built incorrectly and subsequently fails then this can cause cracks to appear in your home.
- Corrosion of wall ties.
- Failure or damage of timber lintels over windows and doors.
- Mining – in former coal mining areas subsidence can occur.
- Heave - refers to upward ground movement as soil expands due to an increase in moisture content. When older trees and shrubs are removed, the ground can swell up as the moisture the tree had previously removed builds up.
Environmental explanations:
- Thermal expansion – this usually affects long or tall brick walls and the overall superstructure of the building. Cracks occur when the brick work is exposed to summer heat and there is a lack of sufficient control joints or expansion joints.
- Leaks – over time leaks can cause water to get into the render and for walls to crack.
- Freezing – ice can affect the render.
- Decay of materials.
- Moisture and temperature changes – significant changes in temperature and moisture like driving rain.
- Vibration from heavy traffic.

Identifying Cracks in Internal Walls
Internal wall cracks are just as common as those found on the exteriors of a house. Some can be harmless. You may also experience the following types of internal crack in your home:
Internal Cracks in Plaster Walls
Cracks in plaster walls can occur if the plaster dried too quickly, if it was mixed incorrectly or as part of environmental change (like temperature/moisture) in your home over time. These types of cracks can be resolved with simple repairs.
If the cracks return, are more than 5mm wide and/or there are corresponding cracks on the external wall then it could suggest wall movement and structural issues. These will need to be investigated.
Cracks around Windows and Doors
If you have cracks around a window or door, then these can be down to the failure of an old timber lintel or a shift in the foundations. Conversely, if the house has been recently built, the timber will still be fairly fresh and may contain a high moisture content. Over time as this moisture evaporates, the timber elements will change, possibly resulting in cracks around windows and doors.
Hairline cracks
Diagonal cracks across the upper parts of the wall (hairline cracks) are usually an indication of a house settling in. Old houses can shift and move over time as temperatures fluctuate. This can result in small cracks appearing as the building adjusts to these minor changes.
Subsidence cracks internal walls
Subsiding walls are usually the cause of more serious internal cracks. They occur when the ground supporting the foundations changes, resulting in an uneven pressure distribution across areas of the building. Internal subsidence cracks will usually occur around doorways, windows and any weak point.
How to Repair Cracks in Walls
There is an inexpensive and highly effective way of repairing cracked walls called crack stitching. With a crack stitching kit, you can repair vertical and stepped cracks to protect the structure of your home. You will need to follow instructions closely when repairing cracks in walls.
What is Crack Stitching?
Crack stitching is a permanent solution to cracks in masonry walls. It involves embedding stainless steel helical bars into horizontal slots into the mortar bed joints of your wall to restore structural integrity.
When do I need Crack Stitching?
If you have identified and resolved the underlying issue that is causing the cracks in the wall to appear, you are then a position to repair the cracks in your walls. Even if you have smaller cracks, it is worth repairing them sooner rather than later as water ingress from leaks or driving rain can make the problem worse. Only once the root cause of the cracks has been resolved you can progress with crack stitching.
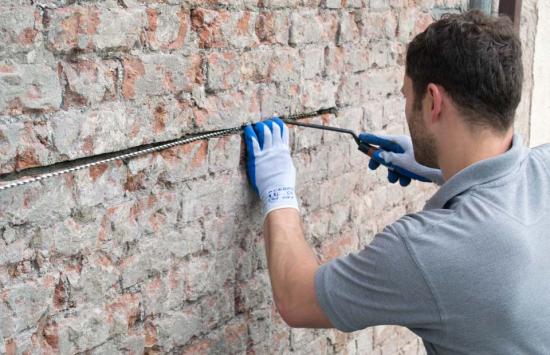
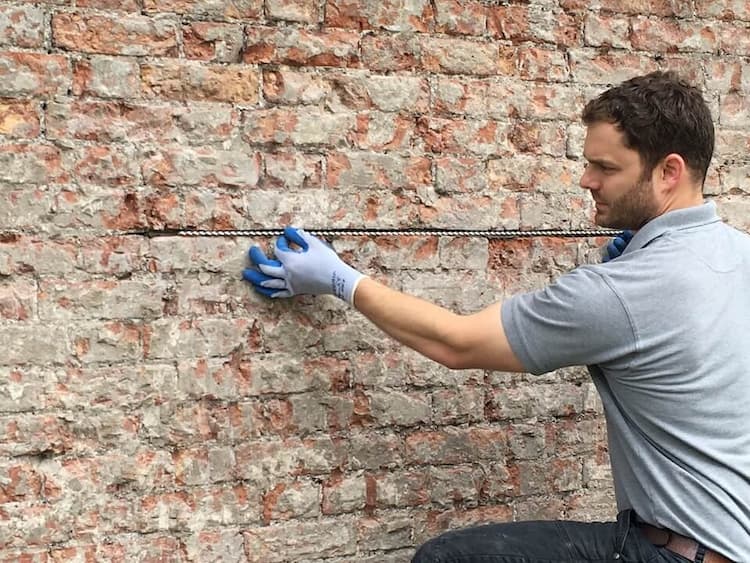
How to crack stitch a wall
1. Cut a slot in the mortar bed just over 500mm either side of the vertical crack and to the correct depth, dependent on the wall thickness (see the chart below).
| Wall Thickness | Depth of Slot | Depth of Bar |
|---|---|---|
| 102mm | 30mm | 20mm |
| 215mm | 40mm | 30mm |
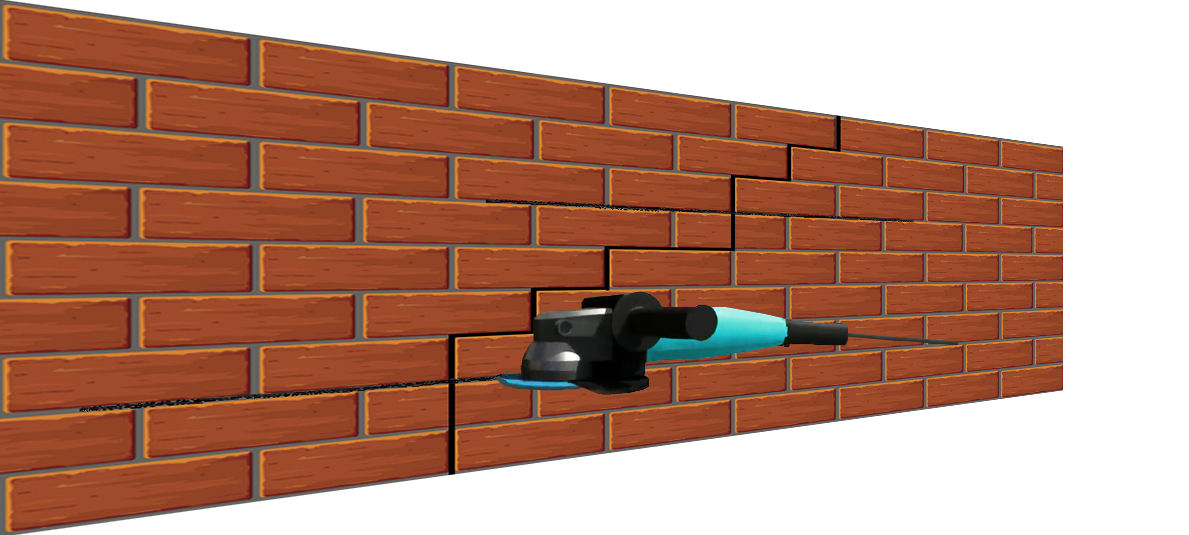
2. Ensure the mortar is completely removed to reveal the top and bottom faces of the masonry. Remove all loose material (you can use a blow-out pump) and then flush the joint with water. Normally vertical spacing is every 4 - 6 brick courses but check with a structural engineer if in doubt.
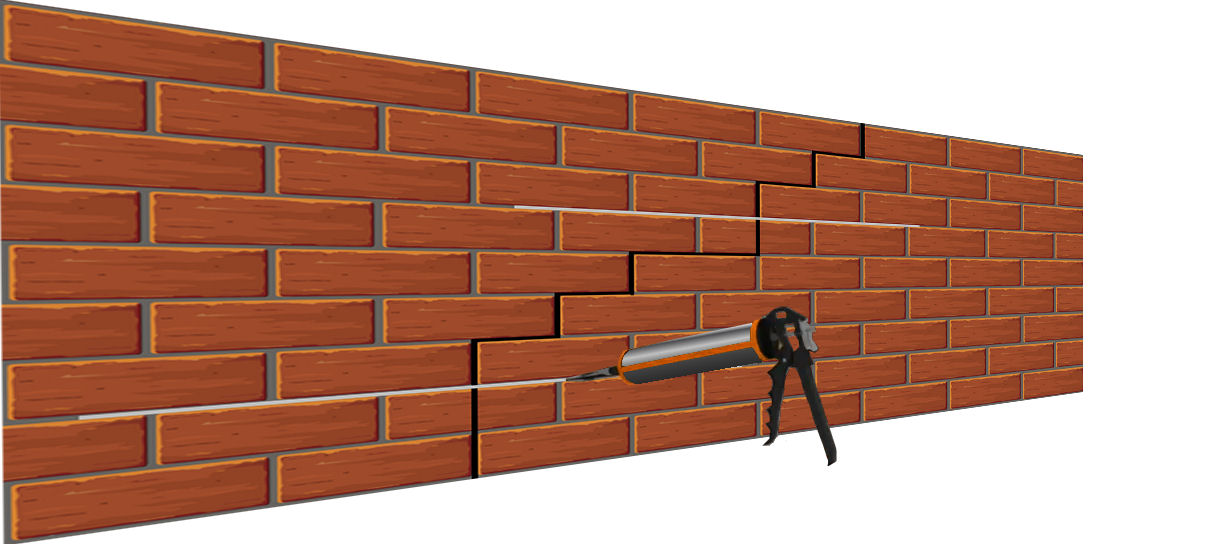
3. Mix the PermaCEM Anchor Grout thoroughly using the paddle mixer provided and load it into the gun. Pump the grout to the back of the slot in a continuous even bead to approximately two-thirds of the slot depth.
4. Push the helical bar firmly into the grout, making sure that the bar extends 500mm either side of the crack.
5. Apply a second bead of grout into the slot, making sure that the bar is completely covered. With the trowel provided, force the grout into the slot until it is approximately 10mm from the surface. Make sure that the bar and grout are firmly packed.
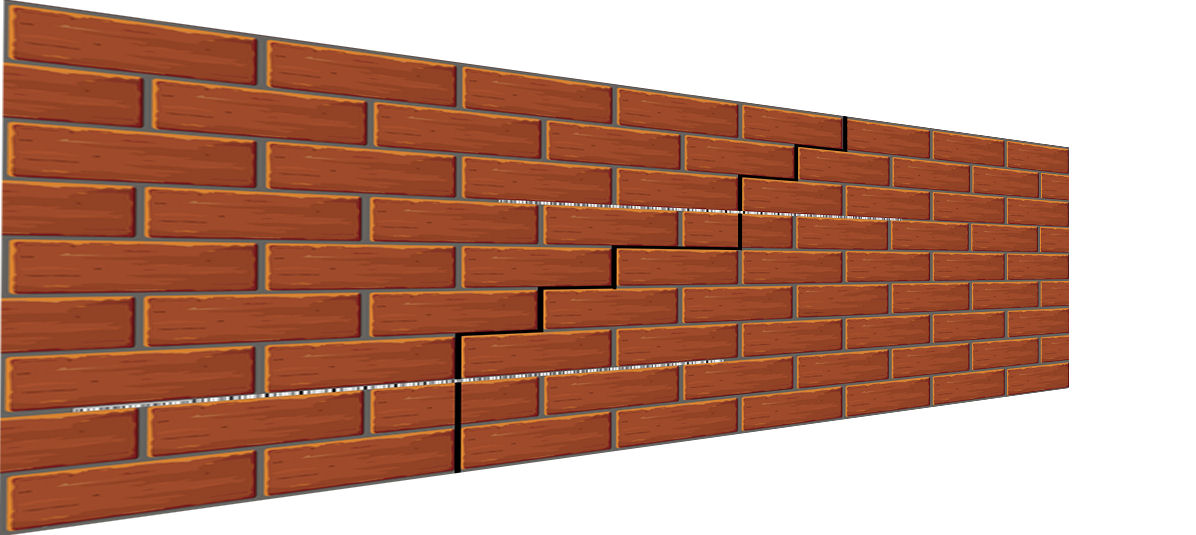
6. Finish by making good the bed joint and filling the vertical crack with an appropriate filler to match.
Tips
If two or more cracks are close together then bars can be lapped (overlapped) ensuring that the bar extends 500mm either side of the outer cracks and that the laps are at least 500mm.
Helical bars should be bent and bonded at least 100mm around corners when cracks are within 500mm of the corner or a reveal etc. This system can be used for rendered or plastered walls.
Crack Stitching Products: What I Need to Repair Cracks in Walls
Permagard sell specialist crack stitching kits, which provide all you need to repair cracks in your wall. Our kits contain helical spiral bars, special grout, a mixing paddle, a mortar gun with nozzles as well as a trowel. Permagard offer both a standard crack-stitching kit and a heavy-duty kit for larger cracks.
Permacem Grout – grout the steel bars into place using Permacem Grout. This shrink compensated grout with added polymer additives which sets around the helical bar and develops compressive strength rapidly to prevent axial deflection of the helical bar under load conditions.
Products
Browse our entire range of Helical Bars.
Permagard – Over 35 years’ property maintenance experience
Permagard are proud of our technical team who are available to advise you on all aspects of crack stitching. Whether you are a specialist installer or want help with installation our technical advisors are here to help. Give us a call today on 0117 982 3282.
Further Reading


