
Wall Tie Replacement - How to Guide
Our wall tie replacement guide provides no-nonsense advice on how to identify wall tie failure. We'll cover the different wall tie options and how to replace the original wall ties.
Whatever the cause of wall tie failure, it is important that the problem is resolved as soon as possible. Failure to act can result in structural damage and even outer wall collapse.
There are a few things you need to do to determine whether you have an issue with wall ties and the correct course of action. To jump to a particular section, click on the links below:
- What kind of wall do I have?
- What are wall ties?
- Identifying the signs of wall tie failure
- Getting a wall tie survey
- Why do cavity wall ties fail?
- How long do wall ties last?
- Replacing cavity wall ties
- How to replace cavity wall ties
- Wall tie replacement cost
What kind of wall do I have?
The first thing you need to find out is if you have a cavity wall. Most properties from the 1930s onwards feature cavity walls. A cavity wall prevents rainwater from entering a building by creating a space between an outer wall and an inner wall. They also make thermal transfer between both walls more difficult by providing insulation.
Do I have a cavity wall?
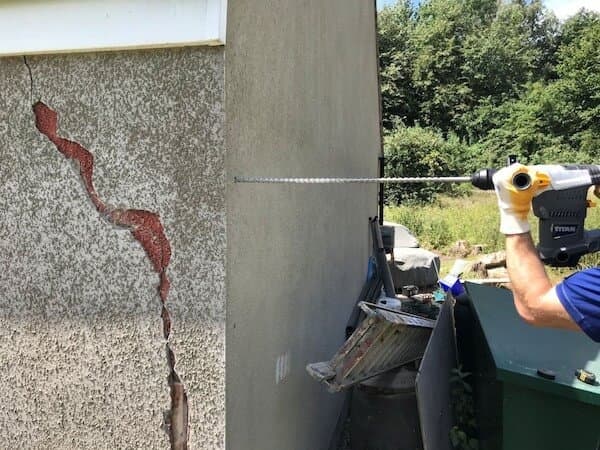
- Measure from the inside wall near the corner of a window to the outside of the wall to get a rough idea of the total thickness.
- If the thickness is over 200mm then this suggests the extra space is a combination of a cavity area and the brick work.
- To confirm this, in a number of areas drill into the brickwork from the outside with a small drill and if after 100-110mm the drill suddenly hits a void this would indicate you have a cavity between layers of brick work. At this point, you can also measure the cavity to help determine the required wall tie length - jump to the relevant section of this guide.
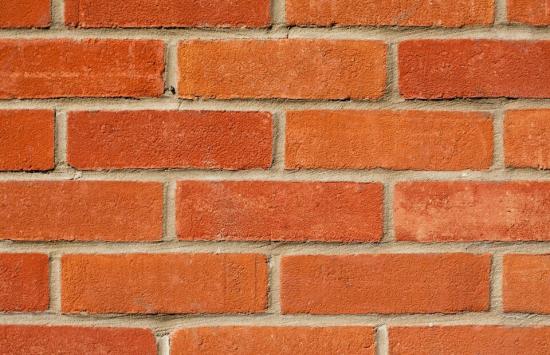
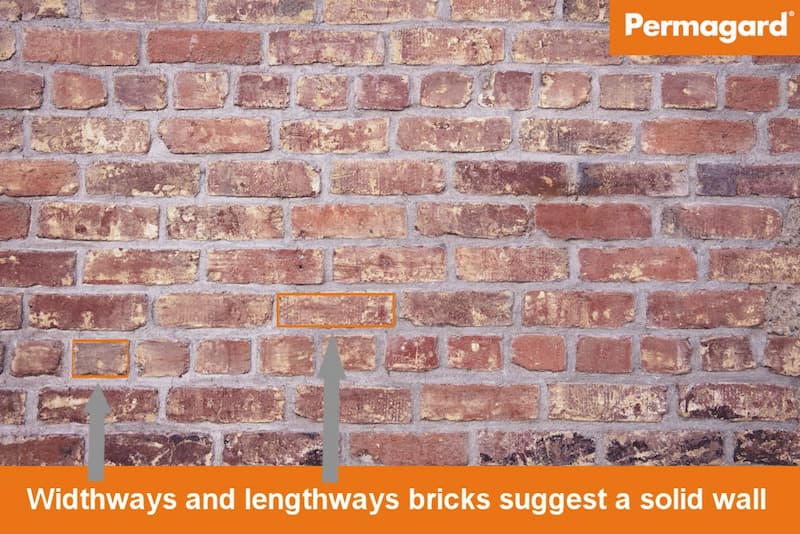
Do I have a solid brick wall?
- A solid wall will usually feature a mix of lengthways and widthways laid bricks. If you drill into a brick of a solid wall, you may only feel a very small cavity (millimetres between the two leaves) before hitting the internal leaf.
- A single skin solid wall is easily identified by looking at doorways and windows - these reveals will only be a single brick width (in the region of 100-110mm).
Identifying a Solid Wall
Identifying a Cavity Wall

What are wall ties?
Cavity wall ties are unseen components that tie the internal and external leaves of a cavity wall together. The ties are added to the cavity wall during construction, with the ends of the ties bedded into the mortar bed at regular intervals.
The wall ties span the cavity, tying the load-bearing inner leaf to the outer leaf. Wall ties impart stability to the outer leaf, holding the wall in place. They are also designed to accommodate small movements from temperature fluctuations, and prevent outside water transfer.
Identifying the signs of wall tie failure
It can be difficult to know exactly when wall ties have failed and to what extent. The most common sign of wall tie failure is the appearance of regular horizontal cracks in your outer wall.
Surveyors tend to use specialist equipment like endoscopes to inspect the condition of the wall ties within the cavity wall. There are also several external visual indications that your wall ties may have failed:
Horizontal Cracks in Brick Mortar
Cracks along the masonry and brick mortar are tell-tale signs that wall ties have deteriorated and started to rust. As the tie rusts, the volume of rust expands inside the mortar where it sits. Over time, widespread buildup of rust can actually crack the mortar between bricks. This in turn, allows more water ingress which leads to more rust.
Brick wall bowing out
Rusting wall ties increase the size of the wall tie which then expands underneath the outer wall brickwork. This can happen to such an extent that the brickwork gets forced off balance, giving the wall a bulging or bowing appearance.
For more information, see our guide on how to fix a bulging wall.
Damaged window reveal
Cracks in the masonry of a window reveal are a clear sign of damaged or corroded wall ties. Like the cause of bowed walls, a build-up of rust on the ties will make the brickwork uneven. This built-up force throughout the wall will create cracks on the reveal due to its structurally-vulnerable edges.
Sagging or lifting lintels
Lintels should always lie at a horizontal angle of 180 degrees as this gives a solid foundation for window or door openings. When lintels appear uneven (having sagged or lifted) it is a sign that the wall at its base is no longer flat.
Read our guide for more information on lintel failure and repair.
Getting a wall tie survey
It is important to get a professional diagnosis before moving forward with wall tie replacement. You can pay for an expert to inspect the property and produce a wall tie survey to confirm the extent of the problem. A fully-qualified structural engineer will usually carry out the survey. They have access to specialist equipment that can determine the condition of the wall ties.
During a typical survey, your structural engineer will:
- Conduct an external inspection of the house, looking at brickwork and the condition of the wall
- Locate the position of the wall ties using a metal detector
- Inspect ties by drilling a hole and inserting a borescope camera into the cavity. If clear imaging isn’t possible, a larger incision into the wall may be required
- Assess the condition of the ties under industry visual grading guidelines
- Produce a report based on the findings of the survey and make further recommendations
Wall tie survey cost
The average cost of a wall tie survey depends on the size of the property. However, you can expect to pay somewhere between £100 and £450.
Why Do Cavity Wall Ties Fail?
Cavity wall tie failure is either down to an issue with the construction and installation of the ties or due to corrosion over time.
Construction Issues
Cavity wall ties can fail because of a construction defect or when they weren’t installed in the first place. It can also come from wall ties with incorrect spacing, fixing or using those that are too short. Poor quality mortar may have been used, failing to provide a strong enough bond for the ties.
Wall Tie Corrosion
Historically, wall ties were made from mild steel that had a galvanised layer or were painted. These coatings don’t last, leaving the steel exposed and allowing it to corrode. According to the Property Care Association, these wall ties could corrode within 20 years of construction.
Corrosion causes mild steel wall ties to expand because the metallic oxide (rust) occupies a greater volume than the pure metal. This can reach up to several times its original thickness. The expansion caused by rusting separates the bricks above and below the bed joints in which the wall ties were laid. This leads to horizontal cracks and compromises the wall structure's load-sharing capacity.
Wall tie corrosion or the lack of cavity wall ties in the original construction is a big problem. Many properties will need either further remedial wall ties inserted, or a replacement of the original cavity wall ties. It's essential that the problem is dealt with to avoid the collapse of the outside leaf and putting yourself and others in danger.
How long do wall ties last?
The lifespan of cavity wall ties is dependent on how recently the structure was built. In the last 50 years, there have been major developments in wall tie design and composition.
- Old, milled steel ties – For houses built between 1930 to 1980, milled steel wall ties were used to attach both wall leaves. At the time, pure steel was seen as the strongest option. Yet, it was later discovered that these wall ties started to degrade within 15 to 20 years.
- Modern stainless steel ties – Most modern wall ties (post-1980) are manufactured using corrosion-resistant stainless steel which can last more than 50 years.
- Neoprene wall ties – In recent years, mechanical expanding wall ties manufactured from stainless steel components and expanding neoprene ends have become the preferred option for professional contractors. This is due to the speed and ease of installation combined with reliability and long-life performance.
Preventing wall tie failure
Wall tie failure can be very costly if not detected and dealt with as early as possible. In its most severe cases, wall tie failure can result in the complete collapse of an outer leaf wall. The more damaged or corroded wall ties become, the more difficult it is to replace them. Taking preventative measures against the causes of wall ties damage is therefore advisable.
Outer wall waterproofing
As mentioned before, corrosion is the cause of most wall tie structural damages. To prevent water ingress from rusting of wall ties, you can apply external waterproofing treatments on outer leaf walls. Products like PermaSEAL Facade Cream and MicroShield Ultra are perfect for ensuring a waterproof barrier on your masonry. Paying attention to and patching any holes in mortar or brickwork is also advised.
Read our guide to masonry & brick waterproofing.
Replacing Cavity Wall Ties
Types of Replacement Wall Ties
Here at Permagard, we stock an extensive range of replacement wall ties – also known as remedial or retrofit wall ties. Our wall ties are manufactured in 304 Stainless Steel to ensure long term protection.
Different wall ties serve different purposes. For example, wall ties designed for constructing new walls should not be used for wall tie replacement. Here are the typical types of remedial wall ties:
Mechanical Wall Ties
- Use: Mechanical remedial wall ties use a 304-grade stainless steel rod. The rod is threaded and has special neoprene expanders on each end. You install it by drilling 10mm holes at the specified intervals and inserting the remedial wall tie. Fixing the wall tie requires the use of a cordless drill to spin the nut on the end. As the nut tightens, it allows the bar to rotate. This expands the inner and outer neoprene, allowing them to grip the substrate and create a new tie between leaves.
- When to use: Mechanical wall ties are only suitable for properties where the brickwork is in good condition. They can only be used in cavity walls without cavity wall insulation and cannot be used in lightweight blocks.
- Products: Neoprene Mechanical Ties
Helical Wall Ties
- Use: Helical wall ties are ideal for anchoring building façades, structural members as well as stabilising multiple width brick walls. They can be used in many different types of building materials to tie the wall leaves together. You install them by drilling a pilot hole into the outer and inner substrate. Using the special SDS adaptor on a hammer mode only setting, you then drive the tie into the substrates. The fins of the helical tie undercut the masonry to provide an expansion-free anchorage. These can then withstand tension and compression loads.
- When to use: Suitable for all brick and block walls regardless of condition as long as it is structurally sound. They can be used in walls with cavity wall insulation and are compatible with light weight blocks however seek technical advice.
- Products: Permagard Easi-Fix Helical Drive Tie - this tie is made from austenitic 304 Stainless Steel.
Resin Wall Ties
- Use: Resin wall ties are pushed into pilot holes that have been pre-filled with resin. More resin is then pumped through the tie and fills around the end in the inner substrate wall. The resin then sets bonding it with the substrates.
- When to use: Resin Wall Ties can be used in almost all building materials. These include brick, block, timber frames and even mortar. They are ideally suited for use when the quality of the inner and outer leaf substrates is in doubt.
Brickwork Type
You also need to identify the type of bricks or blocks used in the property and select the suitable wall tie. The main types are as follows:
- Perforated Bricks – use either an Easi-Fix Helical Resin Wall Tie in a sleeve or the Helical Drive Tie.
- Solid Bricks – use Easi-Fix Helical Resin Wall Tie, Easi-Fix Mechanical Ties or Helical Drive Ties.
- Cavity Wall Insulation – if your property has cavity wall insulation, we recommend using only the Easi-Fix Helical Drive Tie for this application.
What length of wall tie do I need?
The first step is to find out the width of the cavity. You can do this by drilling through the outer wall. You can then measure the drill bit from when it touches the internal leaf and subtracting the thickness of the outer wall.
When it comes to the length of wall ties, we recommend replacement wall ties are embedded approximately 50mm-70mm into the internal leaf of masonry. Therefore, when calculating the wall tie length required, you will need to take the external leaf thickness, add the cavity width and then add 50-70mm for the internal leaf. Then subtract 10mm from the total amount as we recommend recessing the end of the tie in the external leaf.
Example:
External leaf 100mm
Cavity 50mm
Internal leaf embedment 60mm
100 + 50 + 60 (-10) = 200mm
In this example, a tie around 200mm will be required.
Depending on the type of tie you choose, the recommended internal leaf embed varies:
- Neoprene - 50-60mm
- Helical drive ties - 70mm
Note: The width of the cavity brick wall can vary over the length of the wall. You may want to check in different sections to ensure you get the correct wall tie length.

Trade Tip from the PCA:
"The golden rule for repair work is to use a few more ties rather than rely on a few high strength connections. This will overcome any of the weaknesses in the masonry, which have developed over time. Always insert the repair ties before treating the old ties or removing any masonry."
How to Replace Wall Ties
Replacing wall ties is a relatively easy job, providing you have the correct knowledge and equipment. Permagard stock replacement wall tie kits which are easy to use and include everything you need to replace wall ties apart from a drill.
The first step is to identify the positions of the existing cavity wall ties. You can use a metal detector for this.
Having identified the location of the existing wall ties, you can now install your replacement wall ties. Install in positions staggered from the original cavity wall ties.
Replacement ties should not be located closer than 200mm to any existing ties unless this can be shown to be unavoidable.
Wall Tie Spacing
It is very important to get the wall tie spacing correct to ensure structural stability. When you are replacing wall ties, 2.5 wall ties per m2 is the recommended spacing. This translates to at least one wall tie every 900mm horizontally along the brickwork and at least one tie every 450mm vertically.
Recommended Spacing for Replacement Wall Ties

When replacing wall ties, you want to do so in an even distribution in a staggered pattern like a diamond formation. Around openings such as windows and doors, you need to install ties at least every 300 mm vertically and 225 mm away from the opening horizontally.
Recommended Spacing for Replacement Wall Ties around an Opening

Note: Recommended wall tie spacing is for standard-width bricks or blocks that are 90mm thick. If your brickwork is different, then call us on 0117 982 3282 to discuss your options.
You should then follow the installation instructions associated with the wall tie type as detailed in the Types of Wall tie section.
Isolating Original Cavity Wall Ties
Once you have installed your remedial walls ties, you need to make sure that the original cavity wall ties are isolated to prevent further damage to the cavity wall. You can do this by fitting clan sleeves around the external end of the cavity wall tie, which will effectively isolate it. If the ties continue to corrode, they can force the brickwork further apart, causing more damage. In some instances, it may be necessary to remove them altogether.
Important Note: Always install the remedial ties before dealing with the old ties or removing any masonry.
Making Good and Repairs
Once all your ties have been inserted, it is good practice to make good any holes in the outer wall to prevent any possibility of water ingress into the cavity area.
Wall Tie Replacement Cost
The cost of wall tie replacement depends on a number of factors including the total wall space and the type of wall tie you use. The majority of the larger costs involved in wall tie replacement are associated with surveying the property or consulting experts.
Wall tie costs are relatively small in terms of the ties themselves. You can estimate the total cost of wall tie replacement by finding out the total wall space and the number of openings (windows, doors) you have and working it out based on 2.5 wall ties per metre squared. Many of the brick tying systems are quick and easy to use, which reduces the time the job takes and should limit labour costs.
Permagard – Cavity Wall Tie Suppliers
For further advice on cavity wall ties and wall tie replacement, contact us on 0117 982 3282 today. Our team can provide expert technical and product advice free of charge.
Related Content
- Property Care Association’s Code of Practice for the Installation of Remedial Wall-Ties & Lateral Restraint Ties
- Designing Buildings on Wall Tie Failures
Related Products
- Crack Stitching: If your cracks are not caused by wall tie failure, consider a crack stitching kit to repair vertical and stepped cracks in your masonry wall. See our How To Guide: Repairing Cracks In Walls.
- Blow Out Pump – ensure holes are clean and free from dust and debris with this handheld air pump.


")
