
Installing a Sump Pump - How To Guide
When creating a cavity drainage system, your design should include a sump pump to remove any water entering the system. A sump pump plays a vital role in providing drained protection, which means the set-up and installation needs to match your requirements. In this guide, we take you through everything from creating the sump hole, the sump setup to installing the correct pumps.
There are a number of elements you need to consider when planning how to setup your sump. These include:
If you are looking for more basic information on what sump pumps are, check out our guide. You can also see how to install a foul pumping station here.
Can I install a sump myself?
Installing a sump pump is not a DIY job. There are a number of complex elements that are critical to the success of your sump installation and your cavity drainage system as a whole.
Getting a sump installed by a professional basement waterproofing company makes sense - we highly recommend using a qualified basement waterproofing contractor. Here’s some questions you can ask them to understand their approach and you can also get an idea of what’s involved in a cavity drainage installation project. You’ll also need an electrician to do the electrical work.
How to install a sump chamber
The approach to installing the sump chamber depends on whether you are carrying out a new build or retrospective installation. The main difference between these two applications is how you create the sump hole for the chamber to sit in. In both cases, you still need to correctly site and install the sump chamber and pumps, backfilling with concrete. We will cover both situations in more detail in this guide, but here’s a quick overview:
New build sump chamber installation
With a new build basement, you have two options. You can either form a concrete box for the sump chamber, or create a suitable steel cage before pouring in the concrete.
- Steel cage - During the preparation of the reinforcing steel for the slab or raft form a cage of steel of sufficient size to take the sump chamber. Consult a structural engineer around this process. The sump chamber should be fixed securely within the reinforcing steel in the correct orientation and filled with water. Consult manufacturer’s instructions for more information.
- Formed Concrete Box - The idea here is to form a concrete box to accommodate the sump. It should be the same structural integrity as the rest of the concrete slab or raft. The box should be appropriately sized for your sump chamber.
Retrospective Installation - Adding a sump pump to a basement
To add a sump pump to an existing basement, you will first need to decide on a suitable place for the sump. Then you will need to breakthrough the existing screed to create a sump hole of larger dimensions than the sump chamber. You will then need to form a concrete base of at least 150mm thickness to site the sump base on. Once this is formed you should create a box with block work to hold any surrounding earth back. You now have a suitable area to install the sump along with pipework and electrics.
Choosing a sump chamber / tank
The sump pump chamber also known as a sump pump bucket or tank collects water from the drainage system. It also contains the pump(s) that remove the water from the chamber to a safe evacuation point.
PermaSEAL’s sump tanks are manufactured from polyethylene and are extremely robust. Most sump tanks are susceptible to floatation and hydrostatic pressures in high water table conditions. Our PermaSEAL sump tanks however are designed with a large foot at the base of the chamber to prevent flotation.
There are a few things to consider when choosing the most suitable sump chamber.
What size / capacity of sump chamber is required?
There is no exact science on how to choose sump pump size, and your focus should be on the pumps. Having said that, the larger the sump chamber the more time you have before the pump kicks in. Ideally, you want to minimise the number of times the pump is engaged. However, if you choose a sump chamber too big or tall then you run into practical issues with the sheer size of the hole / pit required. Also, with taller sumps you still have an issue of when the pumps kick in. At Permagard, we recommend 150 litre sump chambers for most scenarios.
It is much more important that you get the correct pump specification with the right amount of power for your situation. You need to refer to the pump curve graph to ensure that the pump can handle the flow rate and the head (the distance the pump has to pump the water - remembering that any corners and bends add to the work the pump has to do!). MORE ON THIS LATER>>
The Sump Hole - how to install a sump pit
The sump hole also known as a sump pump pit is where you will locate your sump chamber. The location and dimensions of your pit are important considerations.
Basement sump pits need to be created in the slab - not the easiest job when doing remedial works. The sump pit needs to be adequate to take the size of chamber and concrete backfill. In new builds, as mentioned earlier you have the advantage of being able to factor this into the design - either as a concrete box created within the slab or a steel cage before concrete is poured.
The sump chamber must always be supported by a concrete base and concrete surround. This surrounding concrete must be a suitable thickness for the ground conditions.
Sump Pump Location
The placement of your sump pump matters and needs to be part of your overall design. You need to select a suitable location for your sump pump within your basement or cellar. It is extremely important to locate the sump chamber with permanent access in mind so that routine maintenance of the system can be carried out. The sump lid should be easily accessible when all works are complete. Your pumps and associated incoming drainage pipework should also be accessible if you need to replace any element.
A common mistake when choosing a sump pump location is not to consider where proposed block or stud walls will be built following the drainage install.
There are a number of other considerations around sump pump location:
- Near to the wall of the basement.
- Near to where water will be discharged/evacuation point/pumped out too.
- Avoid any underground pipes, cables, or service ducts.
- Is there already a fall in the floor slab towards a corner - make the most of it. If not, don’t worry as hydrostatic pressure will still allow water to enter your system.
- Access for maintenance - you will need to carry out routine maintenance on the sump pump and drainage system.
- Avoid any block or stud work that is to be built.
How to Form the sump hole
The sump hole, sometimes called a sump pit, is the hole where the sump chamber is located. We’ve already covered where to locate it, now to dimensions and actually forming the sump hole. You will need to break through the concrete floor to create your pit or create a pit/hole in the case of new builds.
Excavating the sump hole
In refurbishing / retrospective projects, you need to excavate a sump hole that is a suitable depth and width. This will always be considerably bigger than the sump chamber to allow for a good concrete base and block walls to be installed.
How wide should the sump pit be?
You want a hole that is at least 400mm larger than the diameter of your sump chamber. This allows you to pour enough concrete around the chamber to stop it from floating.
How deep should the sump pit be?
The depth of your sump hole depends on the dimensions of your chamber and the concrete base on which it sits. You need a concrete base for your sump chamber of at least 150mm thick. Remember to calculate the depth from the top of the slab and not where the floor finish will be.
What you are looking to achieve is the lid of the sump chamber sitting flush with the floor slab.
It is recommended with some units and in some situations to create a small rebate out from the sump. This is to aid with connections into the sump chamber.
It is also recommended that you do not concrete around the electrical inlets, the sump water outlet and any other points that may need to be maintained in the future. Simply use pea gravel around these points.
Forming the sump tank base
The sump tank must always be located on a flat, level concrete base. The base must be large enough to fully support the base of the tank. To create a concrete base for a PermaSEAL sump tank, follow these steps:
- Lay clean hardcore on the base of the sump pit to a thickness of 100mm.
- Lay a mass of concrete at a minimum of 150mm thickness (a thickness adequate for the ground conditions) on top of the hardcore.
- Carefully position the tank onto the wet concrete base. Make sure that no loose debris is knocked into the base and under the tank as you do so.
- Push the tank into the wet concrete to a depth of 50mm, ensuring that the base of the tank is fully embedded into the concrete. Make sure that you position it so that the inlet and outlet pipework are correctly aligned. Allow the concrete to set.
- Now connect the incoming pipe/s to the tank - see below section on plumbing in your sump. To do this you must select the location and drill the appropriately sized inlet suitable for your incoming pipe/s.
- In all applications the tank must be backfilled with a mass concrete mix of a minimum 100mm thickness and used in accordance with the ground conditions ensuring that it is as dry as practical to prevent additional floatation pressures being exerted on the tank.
IMPORTANT NOTE: The tank MUST be ballasted with water at the same rate as backfilling, so that the level difference between the water and the backfill does not exceed 150mm at any time. Please ensure that when pouring the concrete backfill, suitable steps are taken to prevent the concrete from entering the tank and drainage channel.
How to plumb a sump pump - sump pump connections
When it comes to plumbing in your sump pump, you need to consider all sump pump piping in and out of the chamber. Here are the sump pump connections that need to be considered when installing your sump pump system:
- Inlet, from your drainage channel or perimeter drainage system 32mm - 110mm
- High voltage electrical inlets (pumps) - 32mm conduit
- Low voltage electrical inlets (alarms) - 20mm - 32mm conduit
- Waste outlet or discharge pipework (from the outside of the sump) - 50mm external diameter
Connecting the internal sump pipework - inlets
You want at least two inlets into your sump chamber. These will run directly from the drainage channels or perimeter drainage system that has been installed in a continuous run into your sump.
You can read more on perimeter drainage and Type C waterproofing in our guide.
Sump pump discharge pipe installation
The discharge pipe you use must be capable of coping with 1.5x the water pressure generated by the pumps. We recommend that the discharge pipework is 50mm external diameter solvent welded Class E PVC pressure pipe.
To connect the discharge pipework to the discharge spigot on the sump tank you must firstly screw on the Plain/Threaded PVC Socket (supplied already attached) onto the spigot. This will then leave you with a plain socket to solvent weld your discharge pipework into.
Non-return valves must be included in the discharge pipe, usually at the connection of the discharge pipe to the pump.
Flushing the system after installation
Once the sump tank has been installed and all the inlet connections made, but before the pumps are installed, you need to flush the system. Flush the whole cavity drain system through with clean water to remove all sand, silt, drill dust and general debris. This debris will then end up in the sump tank which must then be removed with a wet vacuum or other means. It must not be removed with the pumps as this may damage them and invalidate any warranty.
Sump Setup
The sump setup is all about correctly installing your pumps and all pipework, cables and connections. You also need to ensure you have the correct orientation for your system in relation to where you are pumping water to. We will cover each of these elements in turn.
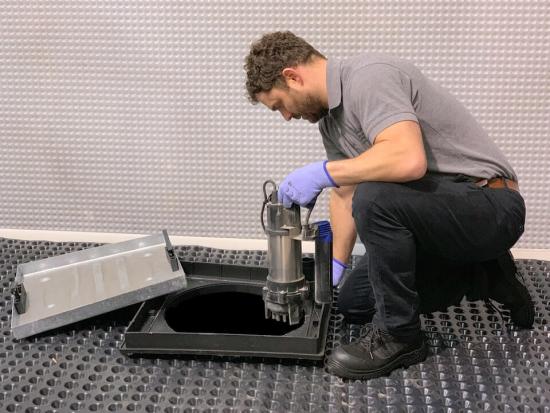
How to install a basement sump pump
The sump pump installation is one of the most complex aspects of the sump pump system. It is vitally important that you begin by selecting the right pump(s) for your needs. We take you through this in the following section before moving onto the pump install. We’ve included detailed diagrams of the submersible pump setup so you can see exactly what is required.
How many pumps do I need? And what pump power?
When installing a cavity drain system with perimeter drainage channel you ideally want a minimum of one sump per 50 linear meters of channel according to the PCA. The most important thing however when it comes to sump pumps is selecting the correct pump based on pump performance curves.
Understanding the Pump Performance Curves
The pump curve is a graph provided by pump manufacturers that helps you determine the correct pump. You need a pump that is powerful enough to pump water all the way along the pipework.
Pump curves plot the flow rate versus head. The head is the distance the pump has to pump the water to get to the evacuation point. This includes how high you’re going up as well as all corners and angles of the pipework as these will all reduce flow. You will need to calculate the total pumped head and required flow rate, remembering to include the depth of the sump in your calculation. You can now refer to the pump curves and select the pump that sits somewhere in the middle of the pump curve. This ensures your pump can do the required job at a desirable efficiency.
All Permagard pumps are CP250 - this is ideal for most domestic basements as it will achieve a flow rate of approximately 120 litres per minute at a head of 4 metres. This is the average head required to pump from a basement.
Single Sump Pump Installation for PermaSEAL pumps
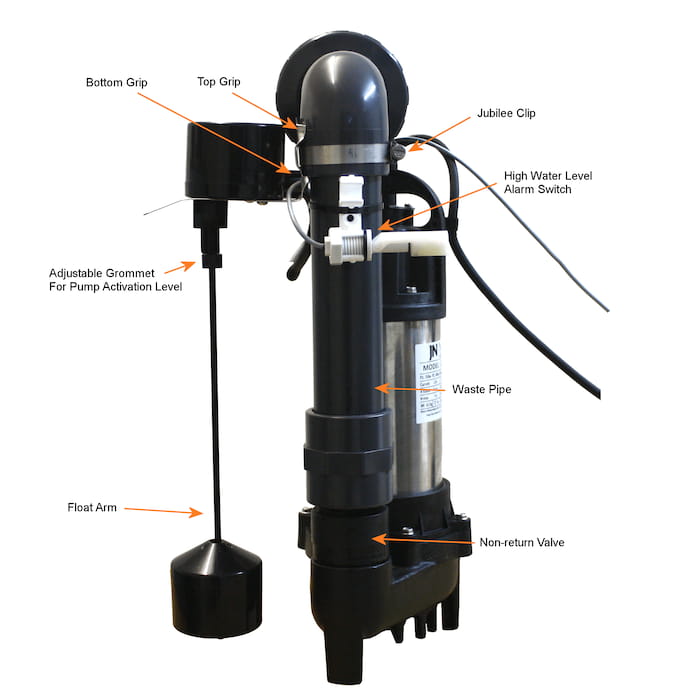
Now we come to installing your sump pumps. We will focus on dual pump installation but include the below single sump pump diagram for reference.
For the single pump system please follow this set up:
- Use PTFE tape around the thread of the non-return valve then screw the waste pipework to the connection.
- Mount the float arm and the high level alarm onto the waste pipe using the jubilee clip (float arm) and zip tie (high level alarm) provided. As per fig 1.
Fig. 1
Dual Sump Pump Installation for PermaSEAL pumps
You may want to opt for a dual pump system to provide extra protection and peace of mind. The dual pump system is designed so that one pump acts as the master pump and the second functions as a backup. The backup is there in case the master pump fails or there is a sudden rush of water beyond the normal volume expected.
The setup of the dual pumps is complicated and critical so we will go over this in more detail.
Dual Pump Setup
Fig. 2
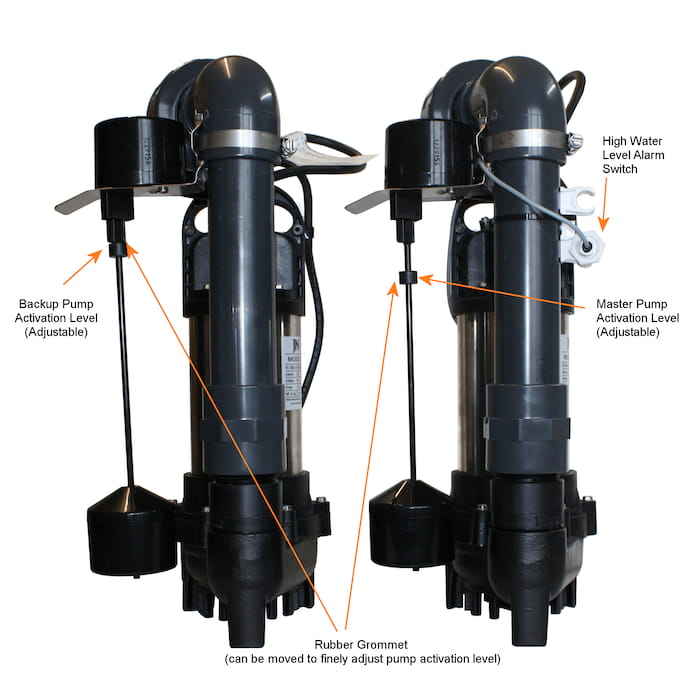
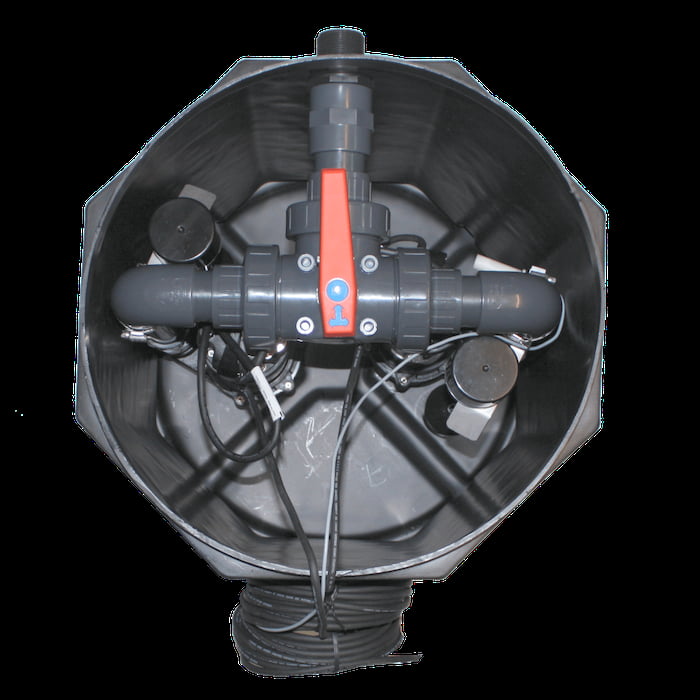
Fig. 3
The fig. 2 diagram shows you the key components of a dual sump setup. We will refer to this as we go through the setup in more detail.
- Start by designating the master and backup pump.
- For both the master and backup pump use PTFE tape around the thread of the non-return valve then screw the waste pipework to the connection firmly.
- Again, for both pumps mount the float arm onto the waste pipe using the jubilee clip. As per fig 1. At this point both pumps will activate at the same time as both float arms are set to their highest activation point. It is now essential that the master pump activates first.
- Move the rubber grommet at the top of the master pump’s float arm downwards so the master pump activates first (see fig 2).
- Now install the High Level Alarm Switch on the master pump waste pipe just above the pump activation point. (see fig 2) This will ensure that the alarm will sound if the master pump has activated but cannot cope with the volume of water entering the chamber or if the pump fails. It is above this point that the activation of the backup pump is set. Normally it is left as the highest setting on the float arm. (see fig 2)
The dual pump setup is now complete. You may need to finely tune the activation setting levels once the pumps are in the chamber and water levels can be tested.
You are now ready to make the internal waste pipe connections.
The PermaSEAL Basement Sump and Pump System is supplied with all the internal pipework required to connect the pump(s) to the external waste outlet.
Simply screw threaded connector(s) to the single or double “shut off” valve. The other side of the “shut off” valve has a threaded connection with two rubber seals and two nuts. These lock the waste pipe through the pre-drilled outlet hole and give a connection for the external waste pipe.
How to wire a sump pump
You need a qualified electrician to complete the sump pump electrical installation. They will need to wire the sump pump to the mains supply, taking into account all the electrical information provided by the manufacturer.
Make sure there is suitable slack on the cable to allow for the pump to be removed for maintenance.
How to install battery backup in a sump pump
In order to offer protection in the event of power failure, you could install a back-up battery for your sump pump. These batteries will allow the pump to function for 24 hours without mains power.
The battery backup unit should be connected in series with the pumps and fed by two independent spurs. You also want the back-up unit to indicate when it is operating.
Sump Alarm Installation
You should always fit a high level water alarm to your sump pump. These alarms are designed to make a noise or alert homeowners when a pump fails or can’t cope with the volume of water entering the sump chamber.
The High Water Level Alarm should be installed in a position where it can be heard by the occupants and action can be taken.
The High level Alarm Switch is installed on the master pump waste pipe just above the pump activation point (see fig 2). This ensures that the alarm sounds if the master pump has activated but cannot cope with the volume of water entering the chamber or if the pump fails.
As the alarm float switch cable is low voltage it should NOT be in the same conduit as the 230V pump cable to comply with building standards. We recommend that the High Water Level Alarm is tested monthly and the battery replaced every two years.
How to operate a sump pump
Once correctly installed and activated, there’s very little you need to do to operate your sump pump system. The system is always prepared for water ingress; the pumps are automatic, and will kick in as soon as the float reaches the preset level. The high water alarm is fitted to alert homeowners to any issues. It is however important to maintain the system. This means regular maintenance of the drainage system and sump pump system.
Sump Pump Maintenance
It is vitally important to maintain your sump pump system, so that it continues to work effectively for many years. It is essential that you avoid any blockages or build-ups that could stop water flowing freely through your system.
Most aspects of your drainage system are vulnerable to the build up of silt, fines and other debris that can enter from outside. You therefore need to carefully consider where to locate your accessible maintenance points so you can carry out regular inspections without difficulty. As part of the maintenance, you will want to clean it by flushing out. To do this, you need jetting eye and inspection ports.
The PermaSEAL Basement Sump and Pump System requires minimal maintenance. However, we strongly recommend that the unit is serviced quarterly during the first year and at least annually going forward.
Permagard recommends employing a professional service specialist to carry out the servicing of your pump system.
Cleaning out your sump pump
To clean out the unit you must first turn off the power supply and ensure that it cannot be inadvertently turned back on (i.e. remove the fuse). Now remove the access cover to gain access to the pump(s). Next you must remove the pump from the tank by disconnecting the pipework and lifting the pump out.
Check the underside of the pump to make sure there is no build up of debris around the pump and the float switch. This kind of build up can often lead to poor pump performance or damage to the pump itself. You must also clean out the sump tank, ensuring that there is no debris in the bottom. Now that the tank is clean, you must reconnect the pump to the pipework and check the function of the pump prior to replacing the access cover.
With dual pump systems it is recommended that the master and back-up pump are alternated when the system is serviced to even out the wear on the pumps.
How to change a sump pump
At Permagard, we recommend that when the time comes to replace a sump pump that you always look to replace the sump pump with an identical model. This is the best option, as the pipework is guaranteed to fit the replacement sump pump.
To replace a sump pump quite simply disconnect the old one from the electrical supply. Then draw the electrical cable into the sump chamber through the conduit remembering to tie the end of the cable to a pull cord so that the new pump cable can be drawn back up through the conduit to the electrical connection.
Once the pump is disconnected from the electrics and the electrical cable is free, unscrew the pump from the discharge connection and remove from the sump chamber being careful not to knock the high level alarm or the other pump that may be in the sump chamber.
Then simply lower in a new pump and connect to the waste pipe and then pull the electrical cable back up the conduit and make the connection to the fused spur.
Please note all electrical work should be carried out by a qualified electrician.
When the pump is powered up, fill the sump with water to test.
Sump Pump Installation Tips
Follow these sump installation tips for a successful and efficient installation:
- site the system with permanent access in mind for routine maintenance of the system.
- remove pump(s) before backfilling the sump with concrete.
- before the pump(s) are installed and run, the system is flushed through and all sand, silt, rubble and general debris removed from the tank.
- pump(s) are set up with the waste pipework, float arms and alarm outside of the sump chamber to ensure correct fitting before plumbing in your sump
Sump Pump Installation Cost
The most frequently asked question we get from homeowners is how much does it cost to install a sump pump in a basement. It’s an extremely difficult question to answer. We also feel like the focus should be on the necessity of providing this protection to your basement or cellar space. Can you put a price on peace of mind?
Sump installation costs depend on many factors, including whether it’s being done as part of a wider refurbishment project. You will also have a huge amount of variation in labour costs depending on the scope of the project and who is carrying it out.
The value of protecting a property from water ingress and creating additional liveable space means it's always worth doing.
- Electrical installation & commissioning - around half a day to one day labour £300-£500.
- Full installation including digging out and electrical installation - £2,000-£8,000 excluding products/materials
Permagard - Basement Drainage & Sump Pump
Permagard are proud of our complete PermaSEAL range and our high-quality sump pump and drainage systems. If you would like to discuss your requirements in more detail, please contact our technical team on 0117 982 3282.


