
How to Install an Epoxy Garage Floor
Garage floors have a rough time of it. Oils, chemicals, spills and endless scrapes as well as dealing with increasingly big vehicles. What you need is a garage floor surface that can cope with everything you throw at it as well as looking seriously good.
An epoxy garage floor is an ideal solution. It provides an attractive, professional look and lasting protection. Impressive glossy finishes are no longer reserved for commercial businesses. With some basic skills and this no-nonsense guide, you can install an epoxy floor in your garage that delivers that wow factor as well as extending the life of your floor and making it easier to maintain and clean.
How to protect your garage floor
Protecting your garage floor from wear and tear is a challenge. Untreated concrete slabs can suffer from damage and quickly deteriorate. This is why many people turn to some form of garage floor coating.
There are a wide range of garage floor coatings, coverings and products designed to protect your garage floor available on the market. Each has its positives and negatives that we will consider in relation to a garage floor epoxy.

Best garage floor coating
There are several options when it comes to garage floor coatings. You want to be able to confidently select the best garage floor coating based on your specific needs. To do this, you need to consider what activities will take place in the garage, how many vehicles will it contain, what levels of traffic will it experience, what chemicals might be present and how important the appearance is. You might be using your garage as a workshop, man cave or gym which might influence your decision too.
We will assume that your garage floor is made from concrete. The following are some of the common garage floor options:
- Polyurethane floors – softer than epoxy and more elastic, PU floors are more resistant to scratches but less hard-wearing. They can cope with extreme cold temperatures. It should NOT be used with epoxy.
- Polyaspartic floors – a variation of polyurea floor coatings, this resinous concrete floor coating is quick to cure and can provide a solid colour.
- Concrete stains – these acid-based chemical concrete stains are available in a range of colours and penetrate the concrete, reacting with it to provide a long-lasting colour. They usually require a sealer. They do not provide any protection to your garage floor.
- Polished concrete – a multi-step and complex process that provides an attractive glossy finish. It’s an expensive option for a garage floor, and reacts badly to some types of spillage. You need to keep it really clean to prevent damage.
- Garage floor paint - these paints tend to be single component polyurethane coatings or latex-based paints. They need to be repainted more often than epoxy.
- Epoxy garage floor coatings – our preferred option that we will discuss in more detail
Garage floor coverings
Garage floor mats & sheet PVC vinyl flooring – PVC flooring can come in rolls or in interconnecting tiles; they are often textured and resistant to petrol, oil, and cleaning chemicals. Other tiles are available that snap together making them relatively easy to install and providing some protection.
What’s the difference between garage floor paint and garage epoxy floor coatings?
Garage floor paint and garage epoxy floor coatings are two different products. The terms however are sometimes used interchangeably. It’s important that you know that the chemical make-ups of these two products are radically different. Epoxy garage floor coatings are stronger and more hard-wearing.
What garage flooring is right for me?
We hope the above gives you some insight into the garage flooring options available and what will match your needs.
In our opinion, epoxy garage flooring is the best garage floor coating. It delivers on the following:
- Durable – hard-wearing with good abrasion resistance, and can cope with traffic
- Resistant to chemicals
- Slip-resistant
- Attractive – many people covet the look of car showrooms and professional garages, this is achievable with garage floor epoxy
- Value for money
Epoxy Garage Flooring
We will now look at epoxy garage flooring in a bit more detail, answering some of the questions about what it looks like, how hard it is to install and how long it lasts.

Benefits of Epoxy floors for garages
Garage epoxy floors are a popular and practical choice, both residentially and at a commercial level. For starters, epoxy is resistant to oil, petrol, transmission fluid, cleansers and other chemicals that are often found in garages. It’s also easy to wipe clean and keep dust-free.
Epoxy floors are also attractive. A reflective gloss look is relatively easy to achieve and appealing for those looking to show off their cars. The combination of aesthetics and practicality is a winning one.
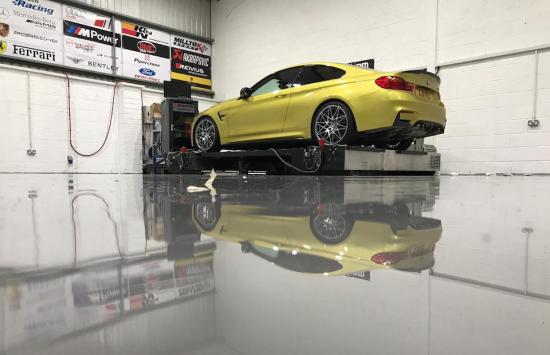
Images of Garage Epoxy Floor
The following images via Diverse Design show the professional high gloss mirror finish that can be achieved with Permagard epoxy floor coatings.


How long does an epoxy garage floor last?
There are plenty of variables that will impact how long your epoxy garage floor will last, such as traffic, the weight of your vehicles and quality of finish. Generally, an epoxy floor should last a minimum of three years and often around five years before it starts to show some signs of deterioration.
How long does it take to epoxy a garage floor?
We recommend booking out three to four days to epoxy a garage floor. This allows a day for preparation and priming, a day to apply the first coat and then the application of a second coat the following day. It’s important to look at the weather forecast and avoid hot and humid weather as well as a cold snap.
How hard is it to epoxy a garage floor?
Installing an epoxy garage floor is relatively straightforward. If you have a good grounding in DIY then you should be able to complete the task yourself, ideally with an extra pair of hands. However, to guarantee the absolute best results, you should use a professional.
It can be hard to epoxy a garage floor alone – we recommend doing it with someone else. This helps with the time constraints when applying epoxy resin flooring.
Overall, is it worth it to epoxy your garage floor? For us, the answer is a resounding yes.
How to install an epoxy garage floor
The next section is where we take you through the epoxy garage floor installation process in detail. However, if you have any questions or concerns at any point call the experts at Permagard on 0117 982 3282 – it’s not worth the risk.
Epoxy application tools
First, you want to make sure you have all the tools you need. The following tools are recommended in order to install an epoxy floor:
- 3-inch paint brush – one for each coat, used for cutting in
- High quality 12” rollers – one roller for each coat. A larger roller can be used if you are covering a large garage.
- Roller frame
- Roller extension pole – can make the job easier
- Large roller tray
- Bucket
- Mixing paddle – to mix the two components
- Variable speed drill - to mix the two components
- Latex gloves
- Painters tape
- Plastic cloth

Step 1 - Preparing your garage floor for epoxy
The key to a high-quality garage floor installation is preparation. The most common reason garage epoxy floors fail is due to poor preparation of the concrete slab. Allow yourself a full day of prep – applying the epoxy floor is actually the easiest bit.
The first task is to remove everything from your garage – easier said than done, we know!
Keep an eye out for any damage to the concrete. Chips and cracks will need to be repaired before you continue. A fast-acting epoxy repair mortar is a good option for repairing a damaged garage floor.
Chances are your garage floor contains traces of grease, oil, solvents as well as any sealers or previous coatings that may have been used. It’s worth testing for any sealants by dropping water on the surface and watching what it does.
You need to remove all potential contaminants before applying the epoxy. There is a challenge around this: you need to remove any contaminants in the concrete slab however you want to do this in a way that doesn’t add more contaminants. For this reason, you should be extremely cautious when using chemical cleaners.
For example, if you use a degreaser to remove grease, you need to ensure that all traces have been removed once the chemicals have done their job. You will need to do this by hosing down the area and allowing to dry. Any traces of the degreaser in the concrete can reduce the bond with the epoxy.
The best way to prep your existing concrete garage floor for epoxy is through mechanical means such as surface scrabbling or grit blasting. You can use a diamond grinder to grind the concrete slab or ‘surface scrabble’ – this effectively takes the top off the concrete leaving it open-pored. Grit blasting by firing sand or quartz at the surface is also an effective method. The aim with these methods is to expose the pores of the concrete so the epoxy can seep in and form a strong mechanical bond. These mechanical methods will help you achieve this.
Note: you may see acid treatments recommended elsewhere online as a way of preparing your floor. We don’t recommend this option as it leaves a residue that will impact the quality of the bond.
How do I know my concrete slab is ready?
Once you’ve completed the mechanical preparation of the slab, you should have a textured and open pored surface. It should feel textured like sandpaper and look even.
Once the entire garage floor is clear, you should sweep and vacuum to remove any dust and debris.
Now that the concrete is prepped, we recommend also using a primer to deal with any potential contamination and help achieve an effective bond. The type of primer depends on the state of the concrete - see next section.
All that’s left to do now is provide some protection to the walls of your garage. Some extra wide masking tape or painters' tape can be placed around the wall floor joint, and you may also want to attach some plastic sheeting to the lower half of the wall.
Important note: health and safety are important. Make sure you have all the safety equipment you need and use it. Ventilation is also a good idea when applying the flooring so open any windows. It also makes sense to wear plastic shoe covers.
Using a primer on your concrete garage floor
The primer should be applied before the epoxy floor coating. It has the additional benefit of making a stronger bond with the primary epoxy floor coating.
Older garage floors are often contaminated in some way. If this is the case, we suggest you clean and mechanically prepare the floor before an oil tolerant primer. This will reduce the risk of debonding of the epoxy coatings.
Some garage floors may be suffering from damp. If the concrete slab does not have a damp proof membrane, then we suggest the floor is mechanically prepared as above before the Epoxy DPM is applied as a primer. You can then apply further coats of the epoxy floor coating.
If the floor is clean with no contamination or damp, then there is no need for a specific primer. The standard epoxy floor coating can be used as the priming coat as these thinner products will penetrate the concrete, followed by the Epoxy floor coating HB to achieve a durable, high gloss finish.
Anti-slip for epoxy garage floor
For heavy use garages and workshops, we recommend an anti-slip additive to provide extra grip. This prevents potential accidents as epoxy floors without anti-slip can become slippery when wet. And as we know, spillages find a way of happening, as does harsh weather.
You should add an anti-slip quartz aggregate to the first coating of epoxy and seal it in with the second coat. This provides a long-lasting anti-slip property. For maximum slip resistance, you can add it to the topcoat too.
To achieve an anti-slip surface, you should add the quartz aggregate after you’ve mixed the two components of the epoxy together. You should then mix for a further minute. You will want to continue to mix during installation to ensure even distribution of the anti-slip aggregate.

How many epoxy floor coating layers do I need for a garage floor?
In addition to the primer layer, you will want to apply a minimum of two coats of Epoxy Flooring or Epoxy HB to your garage floor. This will give you good coverage, colour results and hard-wearing qualities.
After priming your garage floor, wait for 24 to 36 hours before applying the HB. You can then repeat coats of the HB to build up thickness to increase its lifetime and durability. The more coats you apply at this stage the longer the floor will last.
Important note: epoxy garage floor coatings are not self-levelling. As epoxy is not a self-levelling material, you will need to apply a self-levelling compound before the epoxy application.
Step 2 - Mixing the epoxy components
Our epoxy resin garage flooring comes in two tins. You need to open the base and hardener components and mix them independently before adding them together in the larger container. With some products, the container will not be big enough, so we suggest having a clean bucket to hand.
Thoroughly mix the two components together using a mixing paddle attached to an electric high-speed drill. Do this for a minimum of two minutes and until the mixture is streak-free and all one colour.
If you are using an anti-slip aggregate, now is the time to add it and mix for a further minute.
You should not leave the coating in the container, but instead transfer it to a large roller tray, ready for rolling. Some people prefer to pour the coating directly onto the slab and roller from there.
Important Note: Once this process has started, the Epoxy DPM must be laid onto the concrete within 15–30 minutes depending on substrate and air temperature. The warmer the temperature the quicker the product will start to go off. With a bucket life of approximately 30 minutes, this means that you need to start rolling the coating straightaway.
Step 3 - Applying the coating to your garage floor
When it comes to applying an epoxy floor coating in a garage, you need to follow the manufacturer’s instructions carefully. The following instructions are based on Permagard’s epoxy floor coating.
In smaller garages, one person can usually apply the epoxy to the perimeter by cutting in with a 3” brush initially and then rolling the internal area with a lint-free short or medium pile roller. You will need to be mindful of the working life of the epoxy though.
In larger and double garages, it’s best to have two or more installers. This means one person can brush apply the coating to the perimeter of the room, whilst the other starts from a set point internally and rolls out from there.
All Garage Floors provide this great tip: “Before mixing your epoxy, use a strip of painters tape or duct tape and run the roller over it to remove any lint that may be present. You don’t want this showing up in your floor.”
We highly recommend using the cross-rolling method.
Cross-Rolling Method for Epoxy Floors
When applying an epoxy floor, we recommend using the cross-rolling method. You should do this section by section. This method involves rolling the coating front to back (vertical) and then left to right (horizontal) without reapplying the coating to the roller. This should help ensure an even coat and removes air from the coating to avoid bubbles.

The clear epoxy starts out white but dries to a clear semi-gloss finish.
Note: once mixed, you only have 30 minutes depending on the product to apply it to the surface. This means that any epoxy coating you don’t use will be unusable and therefore waste. It cannot be used for the next coat. Do not over apply or apply in single thick coats as this may crack or lead to uncured product.
Tip: it can be useful to use an extended roller to make applying epoxy flooring easier.
Step 4 - Clean your tools
We recommend tools are cleaned with hot soapy water. Roller heads and brushes will need to be discarded – they cannot be reused.
Step 5 - Applying subsequent garage flooring coats
With a garage epoxy floor, you will want to add at least two coats. Allow at least 12 hours to dry between coats and no more than 48 hours. Although the floor will be touch dry after a few hours, it takes a few days to cure properly.
It is vital to provide as much ventilation as possible to the area to help the epoxy to dry. Applying Epoxy Floor Coating in cold, damp, non-ventilated environments can delay drying for long periods of time. Also observe application temperatures on the side of the container and do not use outside of these conditions.
You also want to be mindful of spiders, flies and other bugs. You don’t want your fresh coat of epoxy to become a graveyard of creepy crawlies. Try and create seals over any openings with taped plastic sheeting.
How long does a garage epoxy floor take to dry
For a garage floor, the epoxy drying time depends on several factors such as temperature, humidity, and ventilation. Remember that you need to wait at least 12 hours between coats.
When all coats are applied, it can take a few days to become fully dry. It’s usually walkable in 24 – 48 hours but we recommend leaving it a week before returning your vehicle. It can take up to a fortnight for an epoxy garage floor to fully cure and reach its maximum strength.
How to clean epoxy garage floors
You should clean your epoxy garage floor regularly. This will extend its life and avoid issues with scratches, punctures and chipping.
Start by vacuuming or sweeping away any bits of debris - this avoids any nasty scratches when mopping.
We recommend using a synthetic hard foam mop on the epoxy floor with hot water and a non-acid cleaner. You can then rinse with hot water to remove any residue and then dry with a squeegee. This helps keep your garage floor looking at its best.
Note: deal with spillages quickly using a cloth or paper towel.
Frequently asked questions about Epoxy Garage Floors
Can you epoxy over epoxy in a garage?
This is not recommended as your new epoxy is only as good as the previous coating. Due to this unknown risk factor, you should remove the old epoxy and start again.
How do you apply an epoxy garage floor to a new concrete slab?
With a new concrete garage floor, you will need the slab to cure. This will take at least a month. As the concrete cures it releases moisture that will prevent an effective bond being achieved. On new concrete floors and screeds, it is also essential to remove any laitance by mechanical means.
How much does it cost to epoxy a garage floor?
Most people want to know how much it costs to get an epoxy garage floor, especially when weighing it up against alternatives. The total depends on the concrete finish and the size of the space.
At Permagard, our standard grey epoxy floor coating is supplied in 5 kg containers at £72.50 ex VAT, and our high build (HB) epoxy coating is £70.00 ex VAT for 5 kg. Anti-slip aggregate costs £16.95 ex VAT per 20 kg bag.
Based on a large single garage measuring 4 m × 6 m (24 m²):
- Standard epoxy – two coats
Coverage ≈ 25 m² per 5 kg (0.2 kg/m²). Two 5 kg tins required → £145.00 ex VAT. - HB epoxy – one coat
Coverage ≈ 20 m² per 5 kg (0.25 kg/m²). Two 5 kg tins required → £140.00 ex VAT. - Anti-slip aggregate
Coverage ≈ 10–13 m² per 20 kg bag. Two bags required → £33.90 ex VAT.
Total materials cost ≈ £320 ex VAT (≈ £13.30 per m²). Allow extra for surface preparation, cleaning tools, or an optional DPM layer if required.
We now offer a complete Epoxy Garage Floor Kit that contains everything you need for a professional finish.
To epoxy a two-car garage, you will need to double these costs.
It makes sense to go over slightly in terms of your estimation. 10-15% more than your calculations should provide some wriggle room.
Permagard – Providing Solutions. Inspiring Confidence.
When it comes to epoxy garage flooring, Permagard is the go-to option. We are experienced and approachable, with technical experts on hand to answer any questions you may have. Just give us a call on 0117 982 3282.
Starting from scratch with a garage conversion? Read our full guide to converting a garage.


