
Internal Damp Proofing: The Complete Guide
Damp internal walls are unfortunately a significant problem for many homeowners. When a property has damp, you’ll find that it can affect the atmosphere in the house dramatically - a general dampness pervades with an unpleasant musty smell and often a chill, since damp patches on walls reduce heat insulation. The consequent mould also looks unsightly and is bad for your health - harmful mould spores in the air can potentially lead to respiratory complications. As well as these more obvious issues, damp can also cause structural damage especially to timbers as well as permanent damage to plaster, paint and other finishes.
When you see signs of damp on internal walls, it is evidence of an underlying damp problem. This can be related to condensation, a building fault or leak, bridging of an existing damp proof course and, in rare instances, rising damp. It is imperative that the underlying issues are addressed and fixed before redecoration is carried out.
The root cause of the damp must be treated correctly before any of the following internal damp proofing options are considered. A professional should be consulted so that you know the damp problem has been resolved. Once a room has been correctly damp proofed, you will have a more habitable and comfortable living space.

Identify the Type of Damp
You need to tackle the root cause of the damp, or you will find that it will keep coming back. You need to know what type of damp is affecting your home in order to resolve it – try our in-depth guide to Identifying and Getting Rid of Damp or take a look at the following basic overview:
Condensation
Excess water vapour in the home deposits on cold surfaces and leads to steamed-up windows, damp walls, and mould. Poor ventilation is a common cause.
Penetrating Damp
Penetrating damp occurs when water from outside penetrates the building substrate. This can occur due to a variety of building defects including faults in the joints, roofing, and masonry; failed external render and poor pointing, and damaged or blocked guttering and downpipes. All these relatively common issues result in moisture penetrating your home.
Rising Damp
Most properties have a damp proof course, which provides a barrier to block moisture at a low level and prevent the occurrence of rising damp. If this is missing or ineffective, you may suffer from rising damp. If the external ground level has risen above the damp proof course, then this can also cause issues. Read our guide for more on identifying and treating rising damp.
What are the Internal Damp Proofing Options?
It can be quite confusing to know what internal damp proofing methods and products to use and when, as well as what combination of treatments will ensure your house stays damp-free. That’s where this guide comes in. Find out more about each Internal Damp Proofing option in turn by clicking on the links below or reading on:
LIQUID EPOXY DAMP PROOF MEMBRANES
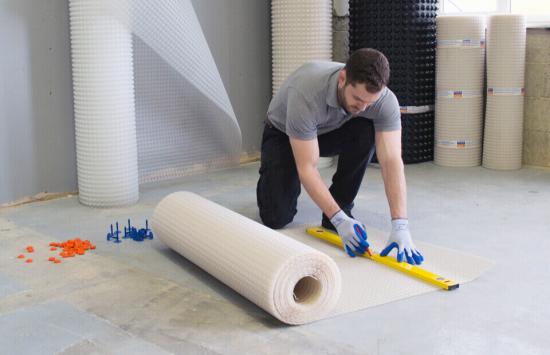
Damp Proof Membranes
A range of different damp proof membranes are available that can be used as part of an internal damp proofing system.
What are Damp Proof Membranes?
Damp proof wall membranes are made from High Density Polyethylene (HDPE) or Polypropylene. Each membrane comes as a sheet with a thickness of between 0.5mm – 1mm with varying sized studs from 1mm – 8mm. The membranes are cut to size and fixed to walls and floors to prevent damp transferring to internal finishes.
How Do Damp Proof Membranes Work?
Damp proof membranes are made from plastics such as HDPE, which are impervious to moisture and moisture vapour. The surface of the membrane is formed into a stud formation – this type of profile, not dissimilar to an egg box, creates a cavity known as an air gap that allows moisture to evaporate from the wall unhindered.
Damp proof membranes have high compressive strength and are also extremely flexible meaning that they can cope with structural movement, which ensures your damp proofing lasts for decades.
When should I use a Damp Proof Membranes?
If you have damp walls and/or walls that have evidence of salts, then you first need to deal with the cause of the damp. Once the underlying damp issue is resolved, you should remove the old plaster and any deteriorated surfaces.
Different types of damp proofing membranes can be used depending on the intended use, the finish you require and the amount of damp and contaminates you need to control. Be sure to consider all these points before selecting a membrane.
As a simplified overview, Damp Proof Membranes can be used to:
- Isolate damp walls
- Isolate salt contaminated walls
- Provide a key on deteriorating surfaces
- Used under a new slab
Damp proofing membranes can also be used where an internal floor level is below the external ground level and waterproofing is required for the lower part of the wall below the damp proof course.
How do I install a Damp Proof Membrane?
Damp Proof Membranes can be applied internally with little or no surface preparation. However, it is very important to install the membrane correctly to prevent expensive water ingress in the future. They should be used in conjunction with a Damp Proof Course in outer walls to create a continuous barrier to water.
Start by removing the old plaster and any deteriorating surfaces then follow these simple instructions:
- Cut the damp proofing membrane to size
- Place the damp proofing membrane on the wall
- Neatly fold the damp proofing membrane around the corners
- Drill then fix the damp proofing membrane to the walls ensuring a tight fit
- Apply wall finish to the damp proofing membrane
Tip
- Buy a Damp Proof Membrane kit, which comes with all you need including fixing plugs, a masonry drill bit and mastic sealer as well as the membrane itself.
Recommended Products
Damp Proof Paint
Damp proof paint for internal walls can reduce the risk of damp resurfacing, acting as a barrier against water. It is easy to apply and maintain.
What is Damp Proof Paint?
Damp proof paint is a non-toxic product (free from solvents and plasticizer) that can be applied to surfaces to act as a barrier to moisture. It often has a consistency similar to a thick emulsion paint and comes in black or white. Damp proof paint may also be referred to as water-resistant paint or damp-resistant paint. After applying damp proof paint, you should no longer have stains appearing. Damp proof paint will allow you to achieve the desired look in your home. It also helps prevent mould growth, which can exacerbate a range of health problems.
How does Damp Proof Paint work?
Damp proof paint contains a powerful polymer that blocks water. The paint incorporates a water-reactive agent, which takes care of residual surface moisture, inhibits mould and protects against damp seepage and in turn stains.
When should I use Damp Proof Paint?
Damp proof paint can be used to treat a variety of damp proof problems but should only be used once the cause of the damp has been rectified. The paint can be applied to cement, brick, plaster, and concrete.
Damp proof paint is most frequently used on walls under a render as a waterproof layer when damp proofing walls, to cover up damp stains on painted areas as well as under tiled areas as a secondary protection for wet areas such as bathrooms. The product is particularly useful for treating moist rooms such as bathrooms and kitchens as well as part of a basement waterproofing system.
How do I apply Damp Proof Paint?
As with all damp proofing products, you need to identify and fix the underlying damp problem. Once the damp issue is resolved, you need to allow the wall or surface to dry out completely – you can use a dehumidifier and increase ventilation to do this more quickly.
You should also repair any damage, replastering if necessary, before applying it. Once the wall is dry, you then need to ensure the affected area is clean. This means removing any old paint and coatings (e.g. bitumen) as well as vacuuming any dirt and debris from the surface.
The paint can now be applied to the surface with a brush, roller or spray, whichever method you prefer. It usually dries within 1 hour to a smooth semi-gloss finish, but you should leave it a little longer before applying another coat. The paint can be painted over with ordinary emulsion paints once it is dry. You can read our guide on how to apply damp proof paint and if you still have doubts, check out our Does damp proof paint really work? article.
Tips
- If you are sanding any affected area before applying the paint, make sure you wear an appropriate mask to avoid dust inhalation.
- A mould wash can be used to ensure the area is free from mould and fungi.
- Do not try and cover too large an area – read the instructions to avoid this.
Recommended Products
Cementitious Tanking
Tanking is a form of damp proofing that blocks water ingress from entering a structure by creating a barrier. We will focus on its internal use, but tanking products are widely used externally in construction. Cementitious tanking allows you to achieve a warm, waterproof and welcoming space.
What is cementitious tanking?
Cementitious tanking is a cement-based coating, consisting of Portland Cements, blended with aggregates and chemical modifiers. It is microporous, meaning that it is fully breathable.
How does tanking work?
Cementitious tanking products contain an acrylic polymer, which after hardening becomes a vapour permeable coating that can withstand hydrostatic pressure. It also helps by improving the strength, bonding and abrasion-resistance of the surface. It is important that it is vapour permeable as this allows the room to breathe and reduces condensation.
When should I use cementitious tanking?
Cementitious tanking is designed primarily for use in walls under ground level, in particular the waterproofing of basements, tanks and ducts. It is applied to the internal face of the structure. It can be used on concrete, stonework, brickwork and blockwork.
If areas of the property are suffering from more severe water ingress, then you should use cementitious tanking as a waterproof barrier rather than damp proof paint. It is also for those situations where the installation of a full damp proof membrane is not necessary.
How do I use cementitious tanking?
You need to prepare your internal surface so that a strong bond can be created. This means stripping your substrate back to the original structure, getting rid of old paint, raking out mortar joints, removing any plaster or bitumen. Without a suitable surface to key to, the bond may be weak and vulnerable to water pressure, so this is an important stage. In older buildings, preparing the substrate may take some time and effort to ensure it is suitable, so be sure to allow for this. Read our guide for more information on damp proofing older properties.
Once the surface is suitable to provide a mechanical key (alternatively, you can use a Bonding Additive) you can apply the cementitious tanking using a tanking brush. You must make sure it is continuous, as any area that you miss will be vulnerable to the build-up of water pressure. Hydrostatic pressure will find any weakness in a tanking system, and water will get through it. After applying a cementitious tanking system, you should always render over the tanking with a minimum of a 10mm sand and cement render coat or coat of renovating plaster before a final plaster skim is applied.
Tips
- Ensure that any decorating material used on top of the tanking is also vapour permeable so the room can continue to breathe.
- Permaseal Cementitious Tanking is available in two colours, white and grey. As a general guide use one colour for the first coat then the other colour for the second coat which makes it easier to see if you have completely covered the surface.
Recommended Products
PermaSEAL Tanking Slurry – Grey and White
Renovating Plaster
Renovating Plaster is designed for use after the insertion of a new damp proof course to stop salts and control damp passing through the wall in the drying out stage.
What is renovating plaster?
Renovating plaster is a pre-mixed, lightweight backing plaster designed to control dampness passing through walls of older properties. It has similar properties to a 1:1:6 (cement : lime : sand) render, but with the sand substituted for perlite aggregate, which makes it lightweight and easy to use.
Renovating Plaster also helps improve thermal performance, with the added benefit of reducing condensation on internal walls and in basement areas. It also provides a barrier against salt transfer.
How does renovating plaster work?
Renovating plaster contains perlite aggregate, which controls dampness that passes through the walls of old properties. Man-made fibres are also incorporated into the mix to control shrinkage, improve flexural strength and reduce the chance of cracking. It also contains waterproofing and salt inhibiting additives to minimise efflorescence, control pattern staining and mould growth.
When should I use renovating plaster?
Renovating Plaster can be used for plastering most traditional background surfaces during renovation work. It can also be applied shortly after the installation of a new damp proof course system or used in conjunction with a basement tanking system. It is best suited to older properties and unlike some other products can be applied to damp walls.
How do I use renovating plaster?
The first thing you need to do is make sure that your surfaces are clean and free from contaminates – remove plaster and existing render, rake out loose masonry joints, cut out timber and vacuum any loose debris and dust. If the surface does not provide a good mechanical key, then SBR Bonding Additive can be used to create a chemical key for the Renovating Plaster to stick to.
When mixing the plaster using a machine, be careful not to exceed a mixing time of five minutes. When mixing by hand, consistency is key so follow the packet instructions. Renovating Plaster should then be applied in one coat between 10-15mm thick. Additional coats can be applied if a greater thickness is required but you will always need to provide a mechanical key.
Tips
- Renovating plaster will be easier to use if it is allowed to stand for a few minutes before it is applied to the wall.
- Renovating plaster can also be used in conjunction with SBR Bonding Additive to further improve the overall resistance to moisture and salts and to further control shrinkage. It should be used in accordance with the recommendations of BS 5492:1990 Code of Practice for Interior Plastering.
Recommended Products
Bulk buy renovating plaster - save big
Liquid Epoxy Damp Proof Membrane
Liquid Epoxy Damp Proof Membranes provide a waterproof barrier for concrete floors.
What is a Liquid Epoxy Damp Proof Membrane?
Liquid Epoxy Damp Proof Membranes have two components - a base and hardener. When mixed and applied to a concrete surface, it forms a barrier against the passage of water and is tolerant of residual moisture in concrete floors.
How does a Liquid Epoxy Damp Proof Membrane work?
The solvent-free membrane contains certain chemicals that allow it to cure rapidly, reducing the passage of water vapour and acting as a barrier against residual moisture.
When should I use a Liquid Epoxy Damp Proof Membrane?
A liquid Epoxy Damp Proof Membrane can be used as an above ground damp proof membrane on concrete floors and concrete screeds. It is often used before the installation of a new floor covering. The surface you want to damp proof must be of sufficient quality.
If you are laying it onto a concrete surface where there is no damp poof membrane or where damage may have rendered the damp proof membrane ineffective, you should consider the possible presence of hydrostatic pressure and the consequences of creating a barrier layer resulting in the pressure/water flow being directed elsewhere.
How do I use a Liquid Epoxy Damp Proof Membrane?
It is important that you prepare your concrete surface before application. First, clean the area, removing all previous coating and other surface contaminates (oil, bitumen etc). The surface should be clean and free from any surface water before applying the epoxy damp proof membrane.
Mix the hardener and base together using a slow speed power stirrer, ensuring the product is thoroughly mixed, is consistent and has no streaks. Apply the mixed material using a lambswool or nylon roller. Where multiple coats are required, the system should be built up, allowing not less than 12 hours and not more than 48 hours between coats. The number of coats depends on the hygrometer reading and should not exceed three coats.
Tips
- Always wear gloves when handling this product.
- If you wish to bond further floor finishes on top of this coating, we advise that you blind the second coat of Liquid Epoxy Damp Proof Membrane with Fine Quartz Aggregate to provide a key for the tile adhesive or grout to bond to.
Recommended Products
Liquid Epoxy Damp Proof Membrane
Anti-Mould Paint
Black mould can look unwelcoming, detract from decorations and exacerbate respiratory conditions. Anti-mould Paint is applied to walls to prevent the recurrence of black mould and mildew.
What is Anti-Mould Paint?
Anti-mould paint is a cost-effective anti-mould product that prevents unhealthy black mould reappearing even when there is persistent condensation.
How Does Anti-Mould Paint Work?
Anti-mould paint works by bringing together modern paint technology with highly effective biocides. The anti-mould biocide is combined throughout the paint film, which has been scientifically engineered for water resistance and durability, imparting toughness and elasticity.
When Should I Use Anti-Mould Paint?
Anti-mould paint is ideal for walls and ceilings in homes as well as a wide range of public and commercial buildings. It is fully washable and resistant to the effects of condensation when the coating is fully dried out.
How to Use Anti-Mould Paint?
In preparation, you need to ensure that the surfaces are free from any loose material such as old paint and wallpaper, dirt, and mould. Mildew and mould should be first removed from the affected surfaces using a Mould Wash or Multicide. Both are surface biocides designed to kill mould and its spores, therefore you should follow instructions when using them. Once the surface is clean, smooth and dry, you can apply the paint in the same manner you would ordinary paint. Stir it first and then use a roller or paintbrush. It’s a good idea to allow for two coats.
Tips
- Follow the coverage recommendations of the product to avoid mould coming back.
- Do not over coat with other paints as they will stop the mould inhibiting properties of the Anti-Mould Paint.
Recommended Products
Anti-Condensation Paint
Our specially formulated PermaSEAL Anti-Condensation Paint can be applied to internal surfaces to prevent condensation.
What is Anti-Condensation Paint?
Anti-condensation paint is a coating designed to repel water and provide thermal insulation to the treated surface. It prevents moisture forming on internal surfaces and causing damp issues.
How does Anti-Condensation Paint work?
Anti-condensation paints work in different ways, with a range of formulations. Our PermaSEAL Anti-Condensation Paint makes use of technologically advanced tiny hollow glass beads that reflect thermal energy away from your interior surfaces. This prevents moisture condensing on your walls, and leading to damp and mould issues. The paint raises the surface temperature of your internal walls to change the dew point (the temperature at which moisture forms on a surface) - this means that condensation takes up to 60% longer to form.
When should I Use Anti-Condensation Paint?
Anti-condensation paint works best when the surface is free from any mould so you will need to treat it first with one of anti-mould products. You can read our guide to removing mould from walls for more information. It is a highly effective preventative product so should be painted in any room at risk from condensation.
How to use Anti-Condensation Paint?
Tips
- apply it to your wall with a standard paint brush or roller
- never use a mechanical stirrer to mix the product as this could damage the glass beads
Recommended Products
PermaSEAL Anti-Condensation Paint
Permagard – the Family Business with over 35 Years' Experience
If you require further information on anything you’ve read in this guide to treating internal damp, then do not hesitate to contact one of our technical advisers on 0117 982 3282. We are here to help!
Find out more about how to damp proof walls in our guide and how to insulate solid walls with ISO-THERM. Learn how to fix a damp chimney or if you are a student suffering from damp read our student guide to dealing with damp.


